Scan2Deploy Studio
Scan2Deploy Studio can be downloaded from the Datalogic GitHub site.
Overview
Scan2Deploy Studio can be used to stage Datalogic Mobile Computers running Android 8 and above. It is installable on 64-bit Windows 7/8/10 PCs.
Some notable features include:
- Configuring the device Wi-Fi network
- Setting device & scanner settings (e.g. the lock-screen enabled state)
- Downloading a data archive from a HTTP/HTTPS server and unpacking it to the device
- Installing/updating applications or firmware
This document reflects the features and settings available in the latest Scan2Deploy Studio release.
Compatibility
-
Scan2Deploy Studio requires Scan2Deploy Android agent version 1.11 or higher running on the Android device. Depending on the features chosen within Studio, the required version may increase. The minimum required version can be seen within the next steps section, but it is recommended to include an update to the latest version within the profile whenever possible.
tipFor Android 8 devices that do not have at least version 1.11 of Agent on the device, it can be installed directly from the "Hi There!" setup screen as described here.
-
For more detail regarding what versions of Scan2Deploy Android agent support what associated Scan2Deploy Studio features, see the full list of Scan2Deploy Android releases.
Installation (Windows)
- Download installer
- Launch the installer (may require authorization if User Access Control (UAC) is enabled)
- Follow on-screen prompts to finish installing
Installation (Linux)
Linux installation is no longer being supported and will not receive any updates past Scan2Deploy Studio 1.7.2
Installation details
To install and add Scan2Deploy Studio to the applications launcher, use one of the following options:
Option 1
- Install the Scan2Deploy Studio .snap using snapcraft.
- Run
snap install --dangerous <scan2deploy-snap-filename.snap>
Option 2
-
Install the Scan2Deploy Studio .AppImage using AppImageLauncher.
tipAppImageLauncher can be installed following these instructions
-
Install/Run Studio
a. Install by double clicking the Scan2Deploy Studio AppImage and choosing 'Integrate and run'
b. Or, to simply run Scan2Deploy Studio without installing, execute the Scan2Deploy Studio .AppImage
Task tray
When Scan2Deploy studio is running, it displays a task tray icon on the Windows taskbar. Right-clicking on the Scan2Deploy Studio icon in the task tray will result in a menu being displayed. This gives you the option to fully exit Scan2Deploy Studio, check for updates or configure certain settings.

Check for update
Choose Check for update, to immediately check for the latest version for your selected update channel.
Settings
-
Run at startup- If checked (default), Scan2Deploy Studio will start after booting into Windows. If unchecked, it will not do so. -
Check for updates on startup- If checked (default), Scan2Deploy Studio will check for updates when it is started. If unchecked, Scan2Deploy Studio will only check for updates when theCheck for updateoption is chosen. -
Update channel- Choose if Scan2Deploy Studio should downloadBetareleases, or onlyStableones.-
Stable - (Default option). Get the latest officially recommended version of Scan2Deploy Studio.
-
Beta - Get the latest release candidates for new stable versions. Updates received from this channel are still in the testing process and may contain features that aren't yet publicly documented. These releases should be considered mostly stable.
-
Alpha - Get the latest Scan2Deploy Studio features and bug fixes as early as possible. Updates received from this channel are under active development and may contain experimental features. These releases should be considered unstable.
infoEach pre-release channel will still include updates from more stable channels. For example,
Alphawill still receiveBetaandStableupdates, whereasBetawill receiveStablebut excludeAlpha.

-
-
Port configuration...- Choose the ports to use for Studio services (see Port Configuration section for more details)
Exit
When the Scan2Deploy Studio UI is closed, it continues running in the background. If you choose Exit, all Scan2Deploy Studio processes (including background) will be stopped.
Carefully consider whether or not you want to completely stop Scan2Deploy Studio, particularly if you are relying on Scan2Deploy Studio to automatically host profiles for mobile devices
Additional Configuration
Additional configuration files beyond the main Studio settings can be found within the following directory: C:\Users\<username>\scan2deploy_uploads\config\
You can paste the following path in Windows File Explorer to get to the config directory:
%userprofile%\scan2deploy_uploads\config
Application Updates
It is recommended to use the default configuration file to receive the latest updates.
Application updates can be customized to target specific versions by adjusting the values found in the %userprofile%\scan2deploy_uploads\config\config.json file. In order to preserve any customizations through Scan2Deploy Studio installation updates, make sure to switch the overwrite-on-upgrade property to false:
{
  "version": "2.2.0",
  "overwrite-on-upgrade": true,
  "overwrite-on-upgrade": false,
  ...
}
If there is a desire to return to the default configuration, individual properties can be deleted and Scan2Deploy will restore the property with the default value. Similarly, the file itself can be deleted and will be restored in its entirety by Scan2Deploy Studio with default values.
Advanced
Certain advanced settings can be accessed through the task tray settings menu.

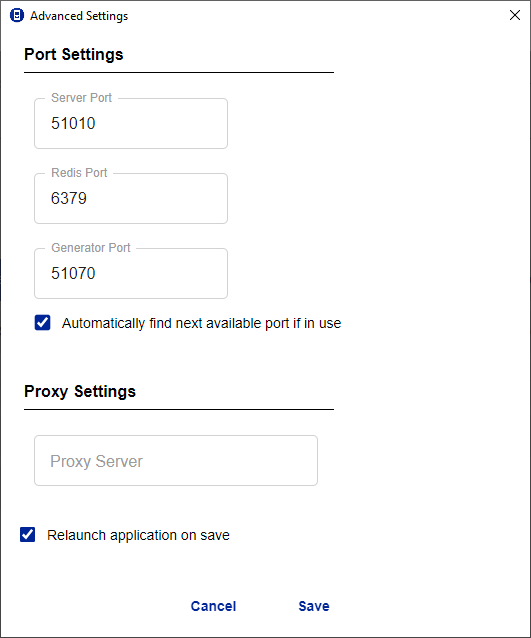
When the option is selected, an additional window will appear with the setting controls:
Port Configuration
Requires Scan2Deploy Studio v2.2.0 or higher
Manual method for v2.2.0 - v2.2.1
Port configuration can be modified by creating a .env file and placing it within the config directory. An example of the available configuration options can be seen below (any missing options will use their default values):
SERVER_PORT=51010
GENERATOR_PORT=51070
REDIS_PORT=6379
As of v2.3.0 of Scan2Deploy Studio, port configuration can be accessed through the task tray settings menu. The following ports are available to configure (valid port range is 1025 to 65535):
- Server Port - Select the port to be used for the main application server (default is
51010) - Redis Port - Select the port to be used for the redis server (default is
6379) - Generator Port - Select the port to be used for the Visual Formatter generator server (default is
51070)
Starting with Scan2Deploy Studio v2.5.0, there is now an option to automatically find the next available port if in use. This feature will begin the availability search at the port value specified in each setting above until one is found. This option is enabled by default, but can be disabled if it is desired to restrict the components to specific ports.
Proxy Server
Requires Scan2Deploy Studio v2.4.0 or higher
A proxy server can be configured when required for the Scan2Deploy server to access resources such as main Scan2Deploy Studio updates and Mobility Suite updates within profiles. A full URL path can be supplied to the field like the example below:
http://<domain>:<port>
Restart behavior
Advanced setting changes will require the application to be restarted before the changes are applied. This restart can be managed directly within the settings advanced settings prompt with the Relaunch application on save option. If checked, Scan2Deploy will immediately relaunch when save is clicked (unless the settings were not modified, therefore not requiring a restart). If unchecked, it will be up to the user to manage the restart before changes are applied.