Frequently Asked Questions
How can I create a new deployment profile?
Follow the below steps to create new Deployment Profile.
-
Click on the
Create Profilebutton on the Scan2Deploy Studio home page. -
This takes the user to the
Action Selection Pagewhere different actions can be selected to include in the profile.- By default, the
Wi-Fi Setupaction is selected. - When the user selects/unselects the actions, the corresponding page is added/removed from the profile.
- At any point of time, users can navigate to any page by clicking on the Stepper buttons available on the top horizontal bar.
- By default, the
-
Click on a Stepper button to edit the page or use the side navigation buttons to move to the next page. For instance, click on
Wi-Fito edit Wi-Fi details. -
Enter all required fields in every selected page.
-
Once all the pages are correctly filled, navigate to the
Save and Scanpage. -
Make any final changes to the profile.
- Profile Name/Description: Profile will be saved with this name/description. Can be modified from any page using the toolbar.
- Mobility Suite updates: Includes latest commonly recommended applications to install
- File Hosting Details (Protocol, Host and Port number, etc.): Remote or local location where the saved profile will be hosted, if needed.
- Scan2Deploy Settings: Configuration related to how the profile is deployed/saved.
- Android Settings: A few remaining Android settings specific to Scan2Deploy (not included in OEMConfig)
-
Once all the required fields are entered, click on
Saveto save the profile and thenPDFto download the barcodes within a file.
How can I create a new firmware update profile?
-
Click on the
System Updatebutton on the Scan2Deploy Studio home page. -
This takes the user to the
Action Selection Pagewhere different actions can be selected to include in the profile.- Notice that the
Firmware UpdateandWi-Fi Setupactions are selected by default and the pages appear in the top horizontal bar. - Device details like
Model(Memor 10, Memor 1, Memor 20 etc.),SKU(US, China, EU etc.) andAndroid OS Versioncan also be specified on this page.
- Notice that the
-
Fill in Wi-Fi details.
-
Click on the
Firmware Updatepage and configure the following fields.- Firmware OTA file
- Reset Type: By default, it’s set to
None - Force Update: By default, this field is unchecked.
-
After completing the
Firmware Updatepage, click on theSave and Scanpage.- Fill in any required deployment details
-
Click on the
Saveto save the profile and thenPDFto download the barcode within a file.
How can I edit an existing profile?
Allows the user to load the existing configuration or firmware update profile to the app and make amendments.
-
Edit or import existing profile:
a. Click on the
Importbutton on the Scan2Deploy Studio home page to be prompted with a file picker window through which an exported profile can be selected.b. Alternatively, if the user is logged in and has previously saved a profile, the edit (
 ) icon can be selected within the saved profiles list.
 -
The app will be initialized to the state the profile was saved at.
-
Once the profile is successfully loaded to the studio, users can edit any pages and save the profile again.
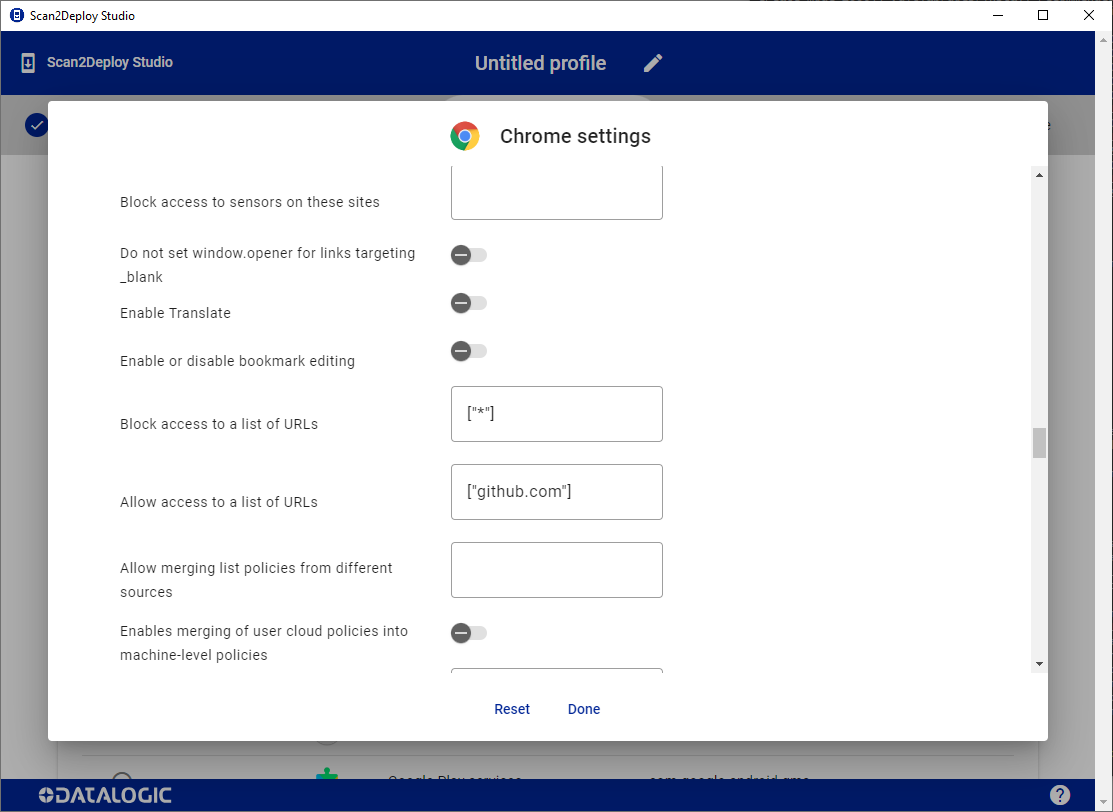
How can I configure Google Chrome with a URL allow/block list?
You can easily use the Applications page in Scan2Deploy Studio to configure Chrome to either allow certain URLs (no websites are allowed other than the specific ones listed) or block certain URLs (all websites are allowed other than the specific ones listed). Note that this is only supported on devices that include Google Chrome in the image ("GMS" devices).
This example only allows access to the github.com website and blocks access to all other sites:
-
While in Scan2Deploy, navigate to the
Applicationspage. -
Click on the configuration button (
 ) in the Configuration column next to
 Chrome -
In the
Block access to a list of URLsfield, enter["*"]. -
In the
Allow access to a list of URLsfield, enter["github.com"]. -
Now, when you have saved and scanned the created barcode on your Datalogic device, Chrome will only be able to access
github.com.
How can I disable or enable the Android navigation bar on my Datalogic device?
It is possible to disable and enable the Android navigation bar using the Scripts page in Scan2Deploy Studio.
-
Navigate to the
Scriptspage in Scan2Deploy Studio. -
Add a
SHELLscript command with the one of the following text:-
Disable navigation bar
adb shell wm overscan 0,0,0,-190 -
Enable navigation bar
adb shell wm overscan 0,0,0,0
-
-
Saving the profile and scanning the created barcode created will show/hide the navigation bar on your Datalogic device.
Why aren't my profiles and/or device selection options appearing in Studio?
This is most often a result in communication being interrupted between the main application and one or more of the background processes. This could simply be a temporary interruption due to changes in the network connection state. To start the initial troubleshooting, step through the following sequence, testing to see if the issue is resolved after each one:
- Wait a few minutes to see if communication is restored automatically
- Restart application
a. Fully shutdown Studio through the task tray option
b. Wait a few moments to ensure all background processes have finished
c. Start Scan2Deploy Studio - Restart PC
If the issue persists through these steps, it could be a sign that one of the default ports from Studio is either being assigned to a different process or being reserved by Windows.
Option 1: Exclude ports from dynamic assignment
This method requires User Account Control (UAC) access
-
Open an elevated command prompt
-
Exclude the Scan2Deploy Studio ports from dynamic assignment:
net stop winnat
netsh int ipv4 add excludedportrange protocol=tcp startport=6379 numberofports=1
netsh int ipv4 add excludedportrange protocol=tcp startport=51010 numberofports=1
netsh int ipv4 add excludedportrange protocol=tcp startport=51070 numberofports=1
net start winnat -
Confirm ports are excluded:
netsh interface ipv4 show excludedportrange protocol=tcp
Option 2: Change port configuration for Studio
As of Scan2Deploy Studio v2.2.0, you can now configure different ports for use by the application.
- Identify free port(s) for use on the system
- Follow the port configuration instructions to change the port(s) for the desired process.