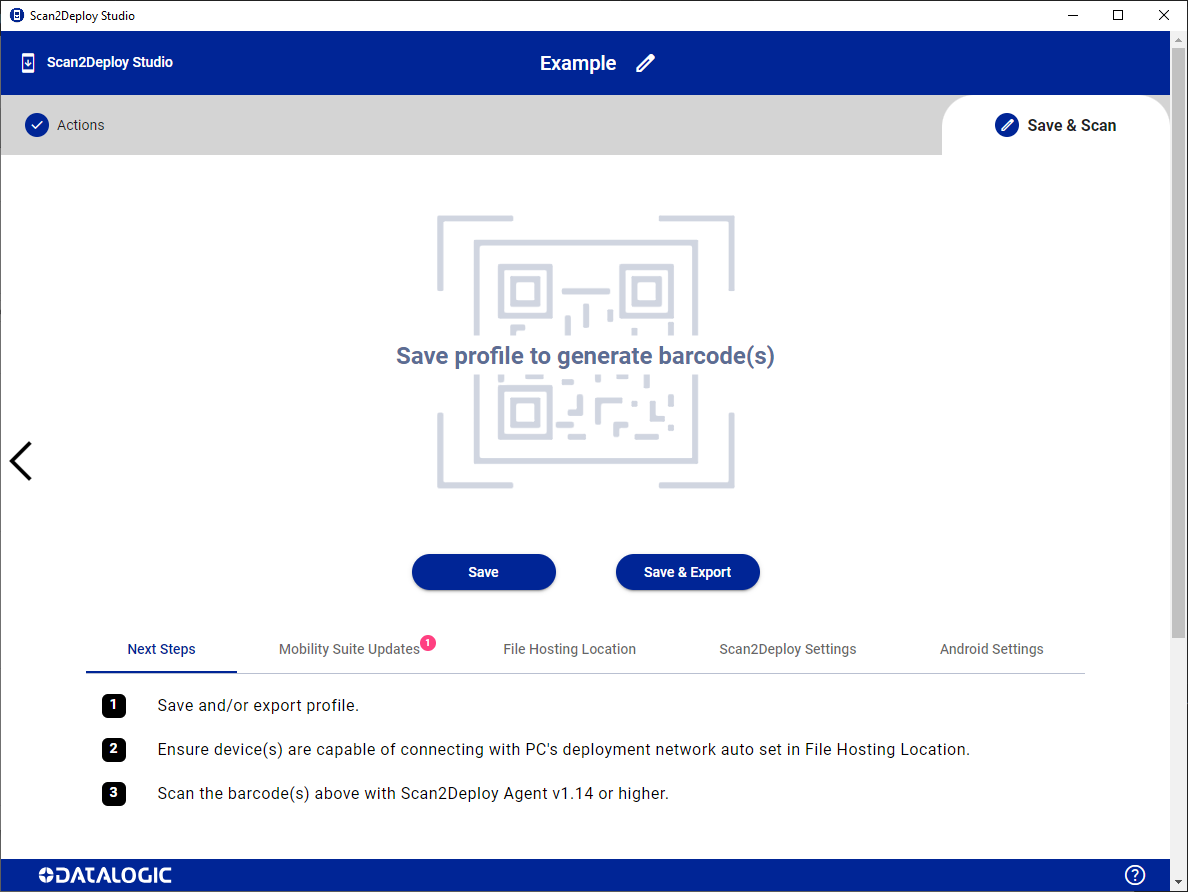
Save and Scan Page
This last page allows users to make some final configuration, as well as save both the profile (.tar file) and generated barcodes (.pdf file).
Name and Description
Both profile name and description can now be accessed by clicking the edit ( ) icon in the toolbar.
Profile name can also be directly edited within the input on the toolbar.
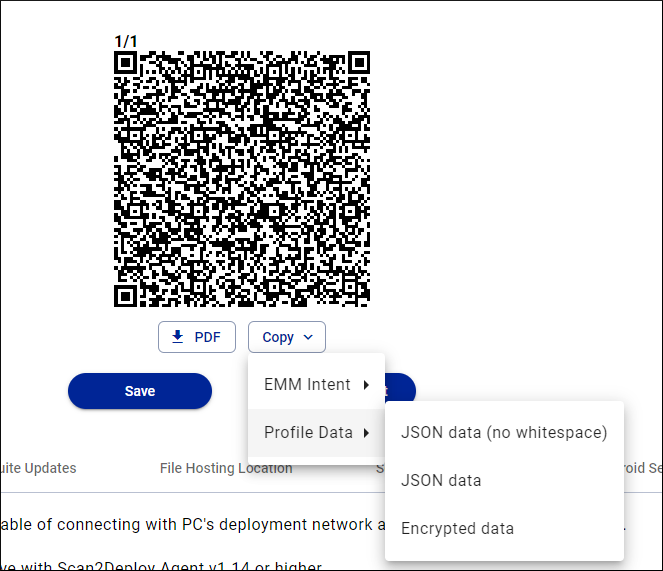
Deployment QR Codes
Once the profile is valid and saved, the generated barcodes will appear at the top of the page. In addition, you can perform the following actions:
- Download PDF
- Copy Data
If no action is selected that requires file hosting, the barcode(s) may automatically appear as soon as the profile is valid. In this scenario, you will still need to click the save button to retain the profile.
You can click on an individual barcode to open an enlarged view to make it easier to scan from the screen.
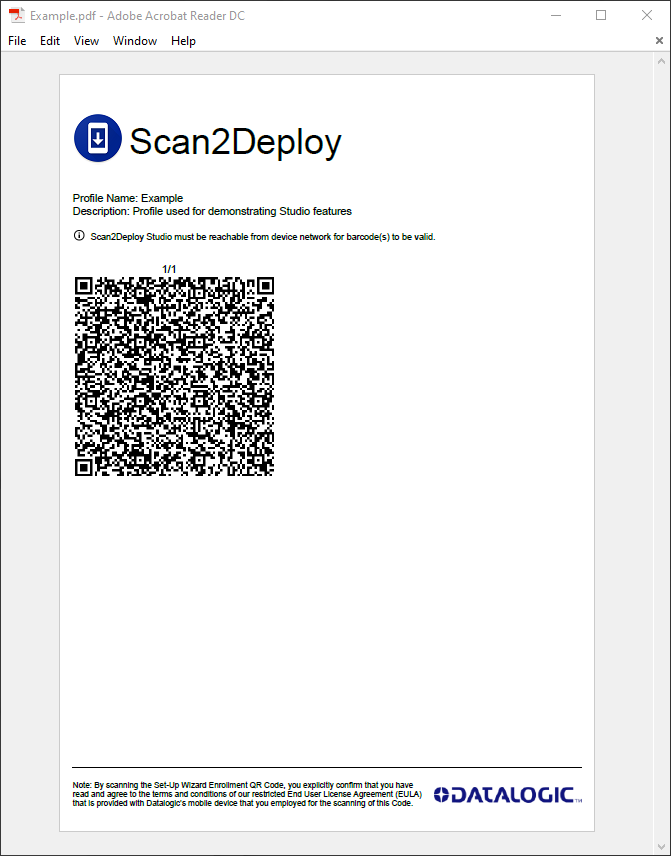
Download PDF
This button allows you to download a PDF document that contains the full set of barcodes generated.
Copy data
EMM Intent
This option will copy an intent with the encrypted barcode data formatted for the EMM listed. The list of supported EMMs may expand at a later time.
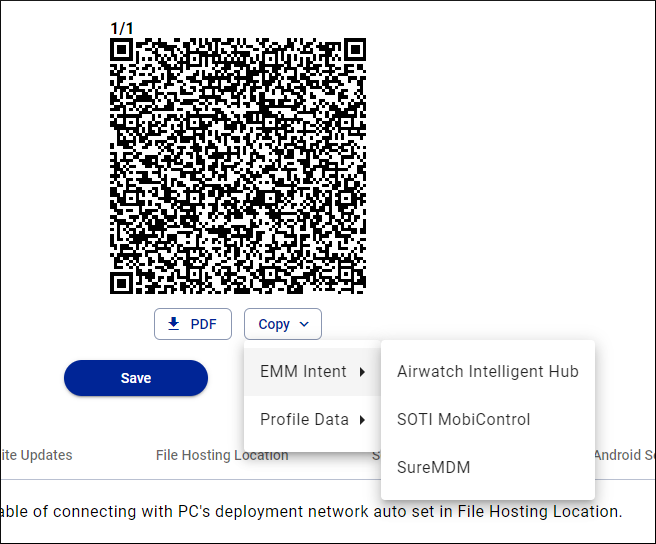
Profile Data
This option allows you to copy the underlying data contained in the barcode(s). It is useful for passing the data to the Scan2Deploy app via the start service and start activity intents. Three options are provided:
-
Copy JSON data (no whitespace) - copy unencrypted JSON for use with the start service and start activity intents, either from Java/Kotlin code or an adb shell.
-
Copy JSON data - copy unencrypted data suitable for pasting into a file. Includes newlines and proper spacing. This could be useful if you want to hand-edit the file and re-import it into Scan2Deploy Studio later.
-
Copy encrypted data - primary use case is also to pass to Scan2Deploy via the start service and start activity intents. Unless you intend on making adjustments to the JSON, this is recommended way of passing data via intent since it is encrypted.
Right click on barcodes and select Copy Image to copy the barcode image itself. It can then be pasted into the application of your choice.
Next Steps
The next steps section will give instructions on what is needed to deploy the profile to devices as well as indicate issues that need to be corrected within the profile.
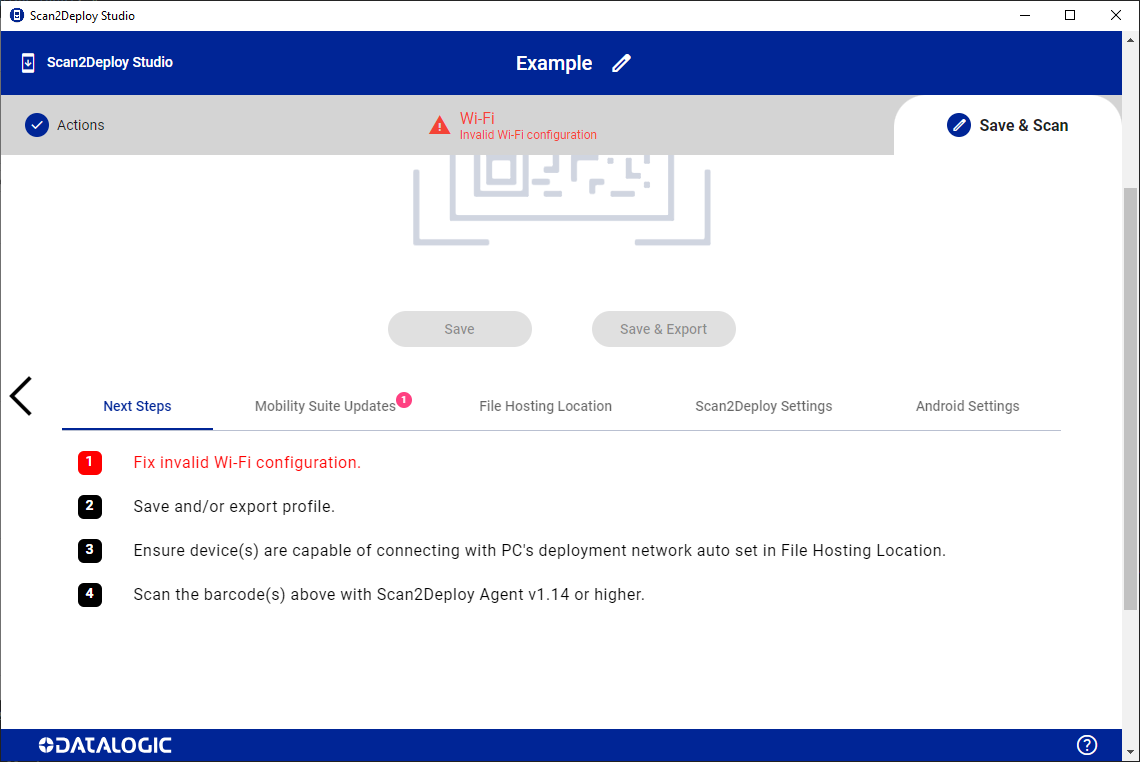
This section should show the Scan2Deploy Agent version required to scan the barcode with to successfully deploy the profile. This value will dynamically change based upon the selection of features/actions.
Mobility Suite Updates
The mobility suite section shows common applications to update on the device. Here you can add/remove updates as well as view some details of the applications, including the version currently added to the profile. In addition, the following symbols will alert to certain scenarios:
 - A newer update is available than the version currently included (when editing/importing an older profile). Click to download the new update.
 - Features/settings have been chosen that depend on the version of the application (in this example, Browser has been configured). It is recommended to update to the latest version.

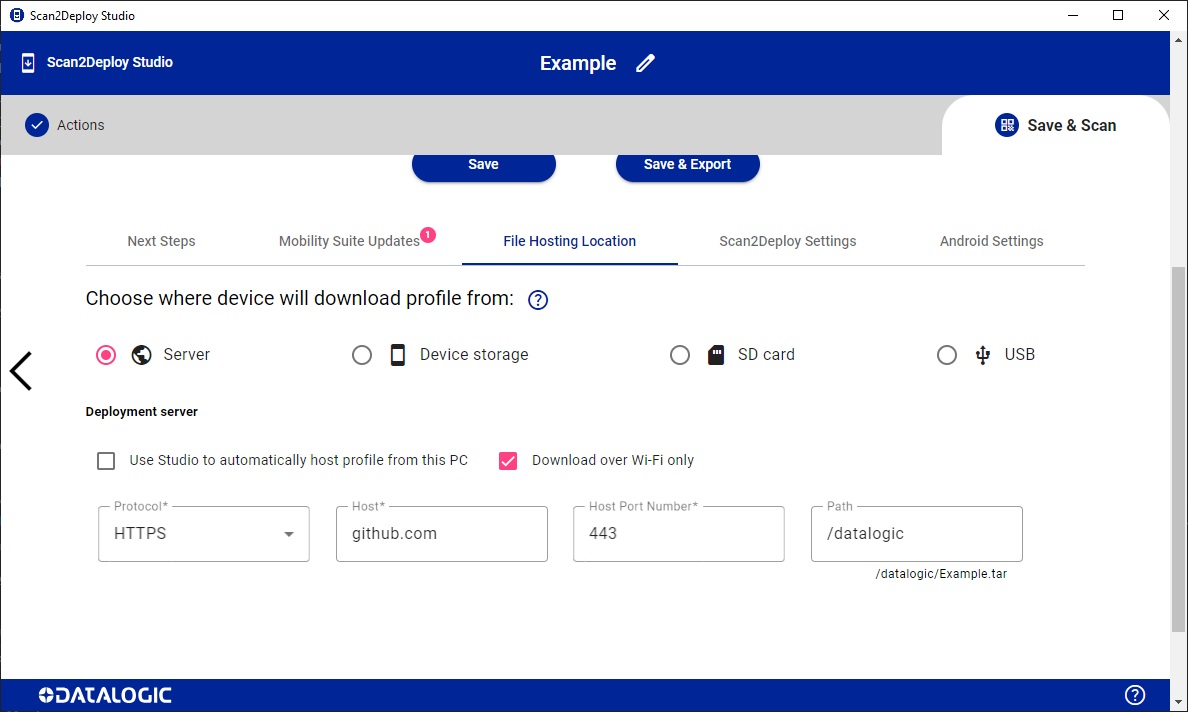
File Hosting Location
This section is enabled if your profile requires a Scan2Deploy profile (.tar file) for deployment. Use this section to specify how the profile will be transferred to the device.
Check the tables in the Action Selection page section to understand which settings require a profile host location and which do not.
Server
The following setting applies to all Server hosting methods, regardless of protocol:
- Download over Wi-Fi only - Profile download will only occur when an active Wi-Fi connection is established. Disabling this option will allow the profile to be downloaded using mobile data, if available. The use of mobile data for the download requires Scan2Deploy Agent v2.6.0 or above.
Scan2Deploy Studio
If the Use Studio to automatically host profile from this PC option is selected, the profile will be hosted directly within Scan2Deploy Studio itself. Scan2Deploy Studio inserts the hosting PC's hostname as well as IP addresses for all connected interfaces to increase the likelihood of a successful profile retrieval by the Android device on the connected network.
Scan2Deploy Studio must be running and reachable by the mobile device. When you close the Scan2Deploy UI, it keeps running in the background. See the task tray section for more detail.
External hosting
If the Use Studio to automatically host profile from this PC option is unselected, the external hosting options will be enabled. In this case, the user is responsible for providing the correct information for where the profile will be hosted. The created barcode will point to the location specified.
SFTP Protocol - If a host key is provided, Scan2Deploy will verify that the server's public key matches the provided host key. If no key is provided, Scan2Deploy will attempt to connect to the server with host key checking disabled.
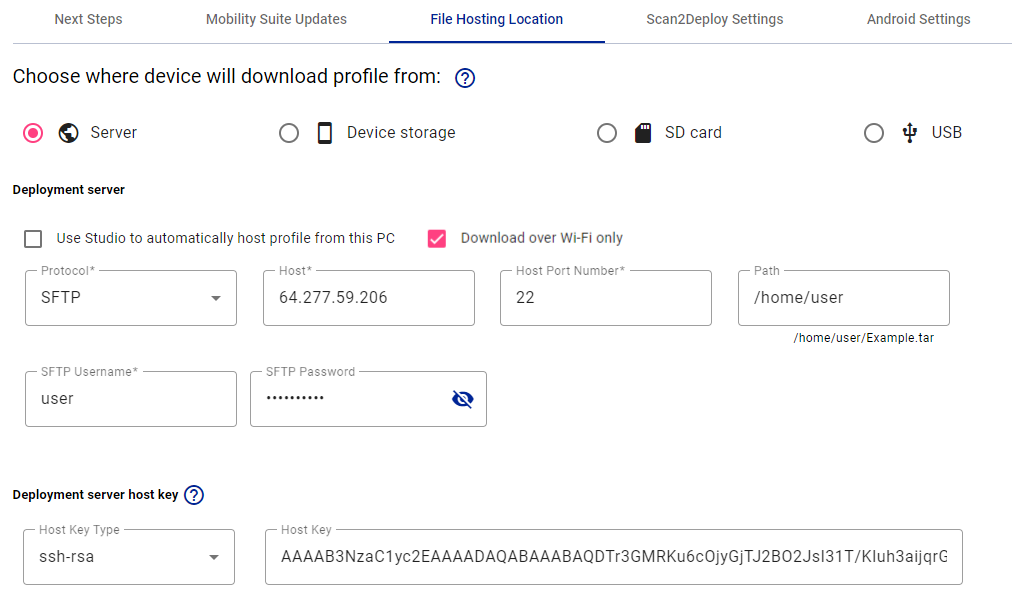
The public key can be obtained from the SFTP host server with the ssh-keyscan shell command. For optimal security, the key should either be verified by or provided by the server administrator.
ssh-keyscan -t [type] [host]
- type - The type of key to fetch from the scanned host. Possible values are rsa, dsa, and ecdsa.
- host - The host name or ip address of the SFTP host server.

Local hosting options
These options allow you to locate the profile on the device. Some likely use cases would be using an EMM to push the tar file to the device and then applying it using the service intent, or deploying in a scenario where the use of a network connection is not available.
Each storage location and their associated path are defined below:
- Device storage - the internal flash storage of the device.
- Path definition: the absolute path to the deployment package on the device.
- Example:
/sdcard/Download/s2d/profile.tar
- SD card - physical micro SD card. This option only appears in Scan2Deploy Studio if the device you selected on the Action Selection page has an SD card slot.
- Path definition: path to the deployment package relative to the root of the removable storage device.
- Example:
/s2d/profile.tar
- USB - a USB hard drive or flash drive attached to the device with an on-the-go USB cable.
- Path definition: path to the deployment package relative to the root of the removable storage device.
- Example:
/s2d/profile.tar
Scan2Deploy Settings
This section contains a few specialized fields relating to how Scan2Deploy profiles are secured or applied on the device
Final Action
-
Action - Determines the last action Scan2Deploy should take before finishing profile processing.
None- Do no final action (default).Close- Exit the Scan2Deploy Agent activity.Enterprise Reset- Perform an enterprise reset on the device.Factory Reset- Perform a factory reset on the device.Reboot- Perform a device reboot.Intent- Send the provided intent URI.
-
Intent - The intent URI that should be sent. Only applicable if the action field is set to
Intent. Two URI schemes are supported within Scan2Deploy, 1) Android App scheme and 2) Intent scheme. An example of how to configure an intent to open the Google webpage within each URI format can be seen below:- Android App URI
- Intent URI
android-app://com.android.chrome/https/google.com/intent://google.com#Intent;action=android.intent.action.VIEW;scheme=https;endnoteIn the Android App scheme example, the package is
com.android.chrome, the data ishttps:google.com, and will intent will result in an action ofACTION_VIEW. This will cause Chrome to open a webpage to Google. Other apps will have different package names and expect different data, which could result in custom actions.In the intent scheme example, the action and scheme are explicitly stated. However, the app package name is not. This will either resolve to the default browser app, or open a dialog for the user to choose an app. Other intent examples may also include a package, category, or component name.
An example for simply opening a custom app with package com.example.app can be seen here:
android-app://com.example.app
Deployment Settings
-
Hide from launcher - Caution if checked, Scan2Deploy will become hidden after the barcode read and the profile is processed fully.
-
Backup to enterprise - If checked, Scan2Deploy will back up the current profile to persist through an enterprise reset. The profile will be automatically re-applied after an enterprise reset has occurred. Factory resetting the device will remove the backup profile. See the below table for the required minimum firmware version for supported devices.
infoAll other devices running Android 11 or above that are not listed in the table are fully supported.
Device OS Version Minimum Firmware Version Joya Touch 22 13
11✅
1.03.007Skorpio X5 13
11
10✅
3.16.001
❌Memor 20 13
11
9✅
3.18.004
❌Memor 10 10
9
8.13.03.10
❌
❌Joya Touch A6 9 ❌ Legend: ✅ Supported in every release •
X.XX.XXXFirst version supported • ❌ Not Supported in any releasecautionThe Memor 10 and Memor 20 have limited capacity which can prevent the backup of large profiles.
-
Treat warnings as fatal - If checked, Scan2Deploy will halt deployment of the profile on the device if any warnings are encountered. This requires Scan2Deploy Agent v2.0.8 or above. This option will be ignored and proceed with the default behavior on older agents.
-
Skip field encryption - If checked, Scan2Deploy will remove any encrypted configuration fields and store all configuration data as plain text. When unchecked, potentially sensitive fields related to Datalogic application configuration (e.g. DL Launcher & DL Browser) will be encrypted within the profile.
noteThis setting will only be visible if there are features selected that will utilize the additional encryption layer
-
Barcode Expiration Date - Set a date on which the barcode will be invalidated and Agent will no longer accept the profile.
-
Padlock Key - A password that can be set to prevent any Scan2Deploy deployment not containing the key from being accepted.
If the padlock is enabled on the device and there is a mismatch in the profile vs. device values, the profile will be rejected.
If the padlock is disabled on the device and the Padlock State is set toLocked, this setting will be set as the device padlock value. -
Padlock State - Enable/Disable the padlock setting on the device.
Default- No change will be made to the device padlock state (Padlock Key will still be required for profile acceptance if the device setting is enabled)Locked- Enables the device padlock. The provided Padlock Key value will be used to accept/reject future deployments on the device.Unlocked- Disables the device padlock. All profiles will be accepted on the device.
importantIt is not possible to update the padlock key in a single deployment. If it is desired to change the device key, the setting will need to be 1) disabled using the old key, and then 2) enabled with the new key.
Scan2Deploy QR Code Settings
Version
Determines how the data in the QR code is encoded.
-
V2 - Default value. Supported in all versions of Scan2Deploy Studio.
-
V3 - Uses a stronger encryption key for enhanced security when generating the QR code (introduced in Scan2Deploy Studio v1.6). This requires Scan2Deploy Agent v1.33 or above on the device to work. See the table below for the required minimum firmware version for some of the devices. Some firmware versions may support the decryption of V3 barcodes, but do not contain Scan2Deploy Agent v1.33. In this scenario, the Agent will need to be updated in order to correctly decode.
infoAll other devices running Android 11 or above that are not listed in the table are fully supported.
Device OS Version Minimum Firmware Version Skorpio X5 13
11
10✅
3.06.004 (✅ with agent update)
2.11.006 (2.08.050 with agent update)Memor 20 13
11
9✅
✅
❌ (1.04.15 with agent update)Memor 10 10
9
8.1✅
❌ (2.03.04 with agent update)
❌ (1.05.13 with agent update)Memor K 9 ❌ Joya Touch A6 9
8.1❌
❌Memor 1 8.1 ❌ (3.06.08 with agent update) Legend: ✅ Supported in every release •
X.XX.XXXFirst version supported • ❌ Not Supported in any release
Silent Deploy
If checked, Scan2Deploy Agent on the device will silently deploy the profile without launching the UI. Requires a minimum Scan2Deploy QR Code Version of V3, compatible with Scan2Deploy Agent v1.33 and minimum firmware versions listed above.
Android Settings
This section contains some remaining Android settings that are not included in the Datalogic OEMConfig application.
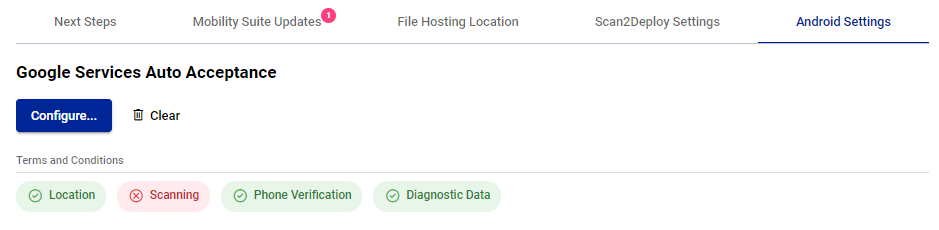
Google Services Auto Acceptance
This section can be used to configure the GMS selections shown during the "Setup Wizard" process after a factory/enterprise reset. The selections are saved per profile, but can also be saved as application level defaults to be automatically applied to new profiles. For newer firmware, if no selection is made, the device will enforce a manual selection/confirmation of this step before finishing the setup and moving to the home screen.
Please consult the GMS Accept Terms column in the AEQR feature table to determine firmware support.
Profile selection
Under the Terms and Conditions section, the current profile selection of each term will be displayed. Each term will either be Unselected ( ), Accepted (
 ), or Declined (
 ).
).
Actions
- Configure... button - opens a dialog where you can make/update terms selections and view more detailed explanations.
- Clear button - Clears the terms selection for the current profile only.
Terms
Location- Allow apps and services to use device location with Location Accuracy featuresScanning- Allow Google to improve your device experience by scanning for nearby devices, networks, and appsPhone Verification- Allow Google to verify your phone number for security and account recoveryDiagnostic Data- Send usage and diagnostic data to Google to improve products and services
Application defaults
Default selections for new profiles can also be created within the selection dialog opened through the Configure... button.
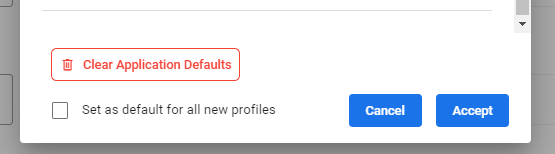
- Set as default for all new profiles - Checking this option will also set the default values for new profiles when clicking Accept. Value of the option has no affect when clicking Cancel.
- Clear Application Defaults - Clears the application defaults for new profiles only. The current profile selection will not be altered by removing the application defaults, profile changes will still need to be made through the Accept and Clear buttons. Note: this option will only be visible if application defaults are currently configured.
Default Launcher App
- Default Launcher - The launcher application that should be used as the default home/launcher on the device. This includes some common predefined options for convenience.
Select Launcher- will make no change to the device.Android Launcher App- will use the standard, default launcher included in the firmware.Datalogic Launcher- will set the Datalogic Launcher as the default.SureLock- will set SureLock as the default.Custom App- will require you to enter the name of a package in the Package name field.
- Package name - Package name of an APK that that should serve as the device's home/launcher app. Not just any application can be used as a launcher app. It has to meet certain requirements specified by Google to be set as the launcher app.
Default Browser App
- Default Browser - The browser application that should be used as the device default. This includes some common predefined options for convenience.
Select Browser- will make no change to the device.Android Browser App- will use the standard, default browser included in the firmware.Enterprise Browser- will set the Datalogic Enterprise Browser as the default.SureFox- will set SureFox as the default.Custom App- will require you to enter the name of a package in the Package name field.
- Package name - Package name of an APK that that should serve as the device's browser app.
Screen Lock
Enables/Disables the device screen lock (keyguard). Choosing Disable has the same effect as choosing 'None' as the screen lock type on the device. However, this has no effect if a password, pin or pattern is currently set. If Enable is chosen OR a password/pin/pattern is set after the keyguard was disabled, the keyguard will be reenabled. Default value is set to No Action.