Scan2Deploy Agent
Documentation for older versions of Scan2Deploy Agent v1 can be found here.
Scan2Deploy is an application devoted to the initial staging of Android devices by reading a barcode sequence generated by Scan2Deploy Studio. It is resident in all modern Datalogic mobile computers running Android 9.0 or higher. Downloads of all released versions are available in the Releases section on the Scan2Deploy Android Github page. However, the app is usually updated directly via Scan2Deploy Studio.
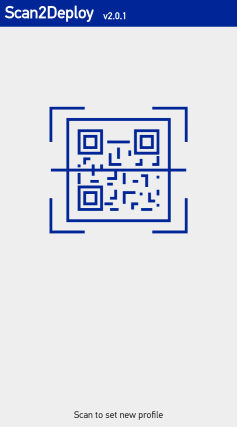
Main Screen
When Agent is initially launched the screen looks as such:
Previous Log
If a profile has been previously scanned, then the Previous Log button will be present. Pressing this button will display the log from the previous profile session. This can be used to review what actions took place when the last profile was deployed, including when restoring from a backup.
The log can alternatively be found on the device at /sdcard/Android/data/com.datalogic.scan2deploy/files/log.txt. The log file mimics the Agent's UI, but also includes the contents of the barcode. It can be useful for debugging deployment issues.
Padlock
Through the dl-stager tool, or custom edit of the profile's JSON, it is possible to set a password, or padlock, on a profile. Once a padlock has been applied to Agent, it is not possible to apply another profile unless it contains a matching padlock. If a padlock has been applied, Agent will display a key icon ( ) in the top right corner.
Starting a Profile Session
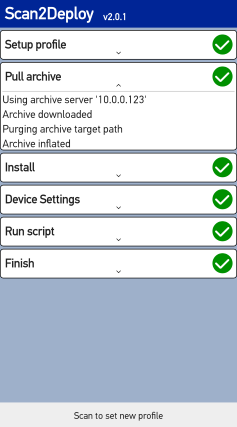
The majority of profiles require a single barcode and, once scanned, Agent will immediately begin to apply the profile. A profile is broken up into multiple stages, such as 'Setup profile'. When a stage is being processed a spinner or percentage complete will be present to show progress. Additionally, while a profile is being applied the abort button will be present at the bottom of the screen. If pressed applying the profile will cease. The screen may appear similar to:

Multiple Barcodes
In the case of a profile requiring several barcodes a grid will appear on the screen to indicate which barcodes remain to be scanned.
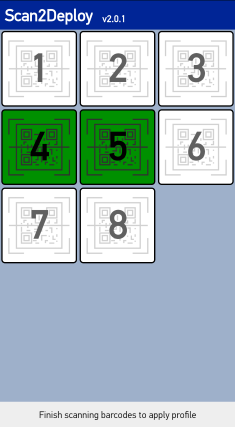
Each barcode is identified by an index number. When a barcode is yet to be scanned a square with the particular barcode's index appears white. When the barcode is scanned it will be green. Once all barcodes have been scanned the profile will be applied.
During the reading of a multiple barcode profile, if a barcode from a different profile is read, then the initial profile is discarded without being applied.
Silent Deploy
A third option is for the Agent service to be launched with no UI interface. This can be done through a v3 barcode or a session intent.
Viewing Session Status
Status
The status of each stage is displayed at its right edge. When a stage is complete there are three possible statuses. Pass, fail, or warning. A pass indicates that the stage has successfully processed, a failure indicates a task of the stage has failed and the profile has not applied, and a warning can indicate several events, but it is non-critical to applying the rest of the profile.
| Icon | Status | Description |
|---|---|---|
 | Pass | Stage has finished, having successfully completed it's associated tasks. |
 | Fail | Stage has failed to complete, profile ceased being applied during this stage. |
 | Warning | Stage has finished, there are some warnings regarding tasks associated with the stage. |
 | Progress | Stage is currently being applied, with an indeterminate level of progress. |
| xx% | Progress | Stage is currently being applied, with a determinate level of progress displayed as a percentage number. |
Details
Tapping on a stage will expand to show details regarding it. Tapping again will collapse to hide the details. Stages can be expanded at any time, even while a profile is being applied. These details range from general information, progress, warnings, or even reasons for failure to apply a profile. The screen will appear similar to:
Session Intents
Alternatively, Scan2Deploy configuration data can be passed into the Scan2Deploy app directly from other Android applications. For instance an MDM agent installed on the device could directly pass barcode data to Scan2Deploy agent, eliminating the need for a barcode to be physically scanned. The following steps are necessary to achieve this.
Start Service Intent
Scan2Deploy offers a service that listens for requests to apply Scan2Deploy profiles without the Scan2Deploy UI (activity) being visible. The profile will be applied silently, without any Scan2Deploy UI being displayed in the foreground.
- Broadcast action:
datalogic.scan2deploy.intent.action.START_SERVICE - Broadcast receiver:
com.datalogic.scan2deploy.S2dServiceReceiver
Extras
| Extra | Type | Required | Default | Description |
|---|---|---|---|---|
encoding | enum | no | <auto-detect encryption> | Indicates how the data field is encoded. Allowed values are:• json - plain, unencrypted JSON file• v1 - v1 encryption, generated by dl_config.exe• v2 - v2 encryption generated by Scan2Deploy Studio • v3 - v3 encryption generated by Scan2Deploy Studio |
data | string | no | null | The data that Scan2Deploy should process that would normally be received in a barcode. |
package | string | no | n/a | Package name of the app receiving the service intent from Scan2Deploy Agent. |
receiver | string | no | n/a | The name of the component that is receiving the intent. |
profile-path | string | no | n/a | A path to profile's tar file. This extra is an alternative to sending a profile through the data extra. Enterprise backup must be enabled. |
json-path | string | no | n/a | A path to file containing unencrypted JSON data. This extra is an alternative to sending a profile through the data extra, but the same JSON data (encoding=json) is stored in a file. |
The start service intent must have either data, profile-path or json-path extra included.
Examples
These examples demonstrate passing properly escaped json data in data extra. The encoding extra must be set to json in this case.
- Kotlin
- Java
- Shell
val i = Intent("datalogic.scan2deploy.intent.action.START_SERVICE")
    .putExtra("package", "com.android.test")
    .putExtra("receiver", "com.android.test.FeedbackReceiver")
    .putExtra("encoding", "json")
    .putExtra("data", "{\"global\":{\"action\":\"reset\"}}")
    .setClassName("com.datalogic.scan2deploy", "com.datalogic.scan2deploy.S2dServiceReceiver")

applicationContext.sendBroadcast(i)
Intent i = new Intent("datalogic.scan2deploy.intent.action.START_SERVICE")
    .putExtra("package", "com.android.test")
    .putExtra("receiver", "com.android.test.FeedbackReceiver")
    .putExtra("encoding", "json")
    .putExtra("data", "{\"global\":{\"action\":\"reset\"}}");
    .setClassName("com.datalogic.scan2deploy", "com.datalogic.scan2deploy.S2dServiceReceiver");

getApplicationContext().sendBroadcast(i);
adb shell am broadcast -a datalogic.scan2deploy.intent.action.START_SERVICE -n "com.datalogic.scan2deploy/.S2dServiceReceiver" --es encoding json --es data '{\"global\":{\"action\":\"reset\"}}'
Start Activity Intent
Alternatively, you can start the Scan2Deploy activity if you want the Scan2Deploy UI to be visible. The same intent extras can be used in this case (encoding and data). These examples demonstrate passing in v2 barcode data exported by Scan2Deploy Studio in the data extra.
- Kotlin
- Java
- Shell
val launchIntent = packageManager.getLaunchIntentForPackage("com.datalogic.scan2deploy")
	?.addFlags(Intent.FLAG_ACTIVITY_NEW_TASK)
	?.putExtra("data", "Bm9uiYc//NWOnA0ZtIrgJ/qy0DCvHR+a1XwUz1sTne8s0KEM9ANwTS0XD4NbIOf/hV0+MM7cOFiZMbUDtO1L4sb4vnJluFbQOEM3phIuCRiBuMtpnh85")
applicationContext.startActivity(launchIntent)
Intent launchIntent = getPackageManager().getLaunchIntentForPackage("com.datalogic.scan2deploy");
launchIntent.addFlags(Intent.FLAG_ACTIVITY_NEW_TASK);
launchIntent.putExtra("data", "Bm9uiYc//NWOnA0ZtIrgJ/qy0DCvHR+a1XwUz1sTne8s0KEM9ANwTS0XD4NbIOf/hV0+MM7cOFiZMbUDtO1L4sb4vnJluFbQOEM3phIuCRiBuMtpnh85");
getApplicationContext().startActivity(launchIntent);
adb shell am start -S -n com.datalogic.scan2deploy/.MainActivity -e data Bm9uiYc//NWOnA0ZtIrgJ/qy0DCvHR+a1XwUz1sTne8s0KEM9ANwTS0XD4NbIOf/hV0+MM7cOFiZMbUDtO1L4sb4vnJluFbQOEM3phIuCRiBuMtpnh85
You can utilize an MDM console to start the Scan2Deploy activity or service with the desired data intent extra. However, that process will differ significantly from one MDM to the next and is outside the scope of what can be documented here.
Receive Service Feedback Intent
If Scan2Deploy Agent receives package and receiver extras within a start service intent then an intent will be sent to the matching application's receiver. The intent will have the following extras:
Extras
| Extra | Type | Required | Default | Description |
|---|---|---|---|---|
feedback | string | yes | '{ "status": "success", "info": "<log.txt output>" }' | Text in a JSON format with two keys: Allowed values are: • status - string indicating "success" or "error"• info - The log.txt output from the profile |
Examples
These examples demonstrate receiving the Scan2Deploy Agent service feedback intent:
- Kotlin
- Java
class FeedbackReceiver: BroadcastReceiver() {

    val TAG = "FeedbackReceiver"

    override fun onReceive(context: Context, intent: Intent) {
        Log.i(TAG, "onReceive")

        if (intent.action == "com.datalogic.scan2deploy.FEEDBACK") {
            try {
                val feedback = intent.getStringExtra("feedback") ? return
                val feedbackJson = JSONObject(feedback)
                if (feedbackJson.getString("status").equals("success", ignoreCase = true)) {
                    Log.d(TAG, "Success")
                    Log.d(TAG, "More info: " + feedbackJson.getString("info"))
                } else if (feedbackJson.getString("status").equals("error", ignoreCase = true)) {
                    Log.d(TAG, "Error")
                    Log.d(TAG, "More info: " + feedbackJson.getString("info"))
                }
            } catch (err: JSONException) {
              Log.d(TAG, err.toString())
            }
        }
    }
}
public class FeedbackReceiver extends BroadcastReceiver {

    String TAG = "FeedbackReceiver";

    @Override
    public void onReceive(Context context, Intent intent) {
        Log.i(TAG, "onReceive");

        if (intent.getAction().equals("com.datalogic.scan2deploy.FEEDBACK")) {
            try {
                JSONObject feedbackJson = new JSONObject(intent.getStringExtra("feedback"));
                if (feedbackJson.getString("status").equalsIgnoreCase("success")) {
                    Log.d(TAG, "Success");
                    Log.d(TAG, "More info: " + feedbackJson.getString("info"));
                } else if (feedbackJson.getString("status").equalsIgnoreCase("error")) {
                    Log.d(TAG, "Error");
                    Log.d(TAG, "More info: " + feedbackJson.getString("info"));
                }
            } catch (JSONException err){
              Log.d(TAG, err.toString());
            }
        }
    }
}