Datalogic QuickBoard
Datalogic QuickBoard can be installed using Scan2Deploy Mobility Suites Updates table.
Overview
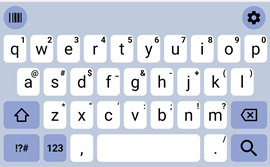
Datalogic QuickBoard is an Android application designed to provide a virtual keyboard, or Input Method Editor (IME), for Datalogic devices. It is similar to the built-in virtual keyboard, but can be customized with user-defined layouts. It supports additional features like access to function keys and scanning. It does not require any changes to existing applications, although an app can be modified to take advantage of some enhanced features.
For more information regarding the editing and customization of the keyboard layouts, please refer to the Scan2Deploy Studio documentation.
Supported Devices
All other devices running Android 11 or above that are not listed in the table are fully supported.
| Device | OS Version | QuickBoard Supported |
|---|---|---|
| Skorpio X5 | 13 11 10 | ✅ ✅ ❌ |
| Memor 20 | 13 11 9 | ✅ ✅ ❌ |
| Memor 10 | 10 9 8.1 | ❌ ❌ ❌ |
| Joya Touch A6 | 9 8.1 7.1 | ❌ ❌ ❌ |
Legend: ✅ Supported in every release • X.XX.XXX First version supported • ❌ Not Supported in any release
Setup
Once QuickBoard is installed, you will need to enable it for use within the device, and optionally set it as the default IME.
On the device
- Open the device Settings app
- Tap on Settings → Languages & Input → On-screen keyboard
- You should see a list of available IMEs. On the row labeled QuickBoard, tap the switch on the right.
- You should see one or more warnings explaining that QuickBoard will have access to potentially secure data. This is due to the fact that QuickBoard can be used to enter user data such as passwords. This data is never recorded and you may safely tap OK to confirm enabling the IME.
Selecting the default IME
Once enabled, QuickBoard may be used by any application which contains a field requiring user input. When an input field receives focus, the device will display the IME (typically at the bottom of the screen) for the user to type input. The IME initially displayed is determined by the currently selected default IME.
To change the default IME, tap the keyboard icon in the lower corner of the navigation bar. A dialog such as the following will appear:

Tap the name of the IME you wish to use. If QuickBoard is not visible in the list, it is not currently enabled. See the previous section for instructions on how to enable it.
Using OEMConfig
Both settings can also be configured remotely through the OEMConfig app, using either Scan2Deploy Studio or an MDM.
| Setting | Managed configuration key | Value |
|---|---|---|
| Enable custom virtual keyboards | VIRTUAL_KEYBOARDS_CUSTOM_ENABLED | com.datalogic.ime/.ImeService |
| Select virtual keyboard | VIRTUAL_KEYBOARD_PROFILE | com.datalogic.ime/.ImeService |
- Scan2Deploy Studio: set these under Device & Scanner Settings → System Settings → Language and Input → Virtual Keyboard, and make sure OEMConfig is checked in the Mobility Suite Updates table so the device has the latest OEMConfig version supporting these settings.
- MDM: set the managed configuration keys above directly on the OEMConfig app.
Adding QuickBoard to a profile automatically enables it and configures the settings above — no manual device steps are required. If another keyboard is already configured as the default via OEMConfig, that setting is left unchanged and takes precedence.
Application use
When an input field receives focus, QuickBoard will be displayed at the bottom of the screen to allow the user to enter data. The layout of the keys available will adapt to the type of data expected by the input field (text, numeric, e-mail, password, phone, etc.).
A toolbar is displayed just above the keyboard layout (if enabled). It contains two buttons on it:
- Scan toggle (
 ): This changes the keyboard layout into a single scan button for easy scanning. This trigger behaves the same as any physical scanning trigger on the device.
 - Settings (
 ): This launches the settings screen for modifying the appearance/behavior of QuickBoard. The available settings are detailed in QuickBoard Settings.