DXU Desktop
DXU has been deprecated on newer devices or devices running Android 13. Click here for more information on how to migrate from DXU to newer solutions.
DXU Desktop can be downloaded from the Datalogic GitHub site.
Overview
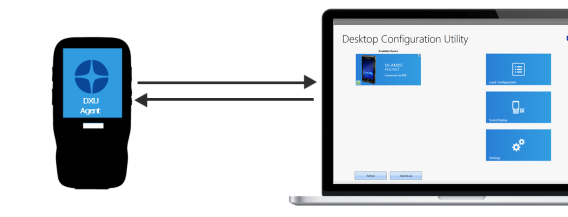
DXU Desktop is a utility used to configure devices, update device firmware, control devices remotely, and provide device tethering capability. The DXU Desktop application runs on a Windows PC, while the DXU Agent application runs on Datalogic mobile computers (both Android and Windows CE).
Installation
Once downloaded, the installer can be either used graphically or from a Windows Command Prompt.
Graphical Install
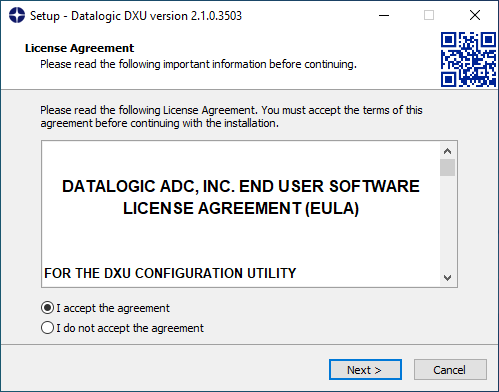
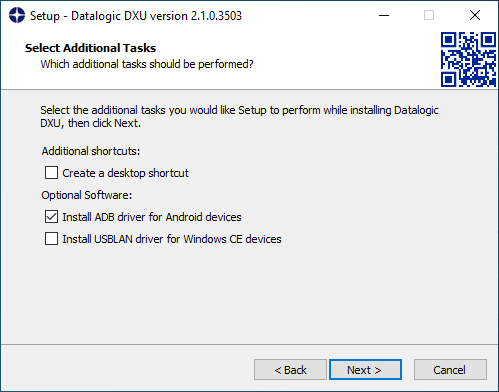
You will be presented with the following screens during the install process.

Command Prompt Install
At the Windows Command Prompt, and assuming DXU_version.exe is the DXU installer executable, you can perform a silent install as follows.
-
Silent install without ADB or USBLAN
DXU_version.exe /SILENT -
Silent install with ADB:
DXU_version.exe /SILENT /TASKS="adb" -
Silent install with USBLAN:
DXU_version.exe /SILENT /TASKS="usblan" -
Silent install with both ADB and USBLAN:
DXU_version.exe /SILENT /TASKS="adb,usblan"
Application Overview
Datalogic DXU several useful features for connected mobile devices:
DXU can connect directly to individual Datalogic mobile computers that connect either directly to a PC via USB or remotely over a network, either via Ethernet or Wi-Fi. DXU reports information about currently connected devices.
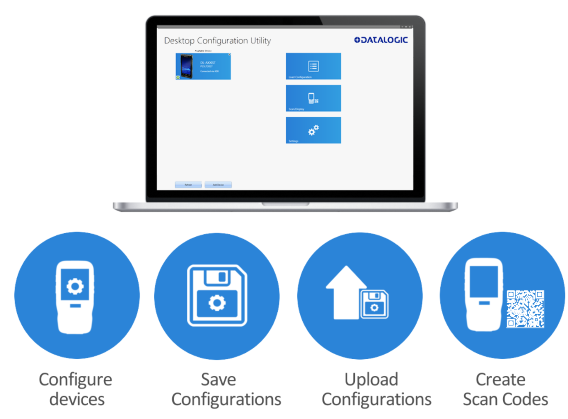
DXU can configure a wide variety of device parameters, including the scanner and most decoding parameters, the touch screen and the keyboard, interfaces such as NFC, Wi-Fi, Bluetooth, USB, and Ethernet, device settings such as date, time, time zone, and power management, and security settings such as password access. DXU can also configure communication parameters between the application that runs on a PC and the client applications that run on Datalogic mobile computers.
DXU offers a method to print out barcodes that Datalogic mobile computer users can scan to quickly connect to DXU called Scan2Deploy.
DXU offers remote control capabilities for remote troubleshooting. There are some limitations to this (not too remote), but it allows a DXU administrator an opportunity to remotely operate a Datalogic mobile computer to check settings, configure the device using its own user interface, and to see what a user sees.
How DXU Works
DXU is really two applications working together. The DXU desktop application runs on a Windows PC, providing convenient UI to configure Datalogic mobile computers. An application runs continuously on Datalogic mobile computers to extract current configuration settings and send them to the DXU desktop application, and to receive updated settings from the DXU desktop application and apply those configuration settings to the mobile computer.
DXU configurations are stored as configuration files on the PC, and are transmitted to and from the Datalogic mobile computer as XML web pages. XML is a standard data format that is widely used for a variety of applications on the internet. Some data is encrypted in the XML file to protect your sensitive data from prying eyes, but most data which is not sensitive is transmitted in plain text that can be easily viewed and analyzed.
DXU can connect directly to devices that are plugged into your PC via USB, including those inserted into a powered dock which is connected to your PC via USB. DXU can also connect to devices on your network. DXU supports connecting only to devices in the same subnet as the PC running DXU. Datalogic mobile computers connected to Wi-Fi wireless access points can connect to DXU as long as the AP is on the same subnet as your PC. Datalogic mobile computers connected over Ethernet can connect to DXU too as long as they connect on the same subnet as your PC. Ask your network specialists for more information.
Supported Datalogic Mobile Computers
DXU supports select Datalogic mobile computers that run Android and Windows CE operating systems.
Supported Android devices
- Joya Touch A6
- Joya Touch A6 Healthcare
- Skorpio X4
- Falcon X4
- DL-Axist
Supported Windows CE devices
- Skorpio X4
- Falcon X4
- Skorpio X3
- Falcon X3 / X3+
DXU Log files
DXU logs its activities to a file. This can be useful for technical
support to help diagnose problems. DXU’s default log file location is at C:\ProgramData\Datalogic DXU\default.log.
DXU Desktop Tasks
Available Devices Page
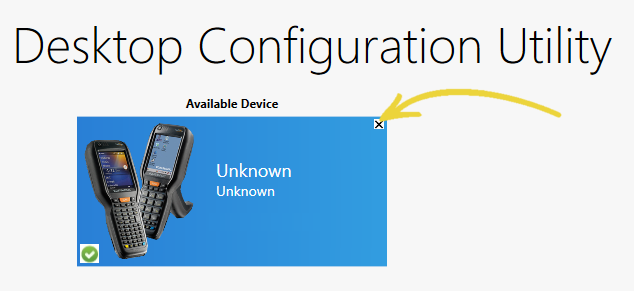
The Available Devices list displays devices which are either currently connected, have been connected since launching DXU, or were manually connected at some time in the past. You can refresh the view to automatically show devices or hide devices which connect while you work on another device. In general, they should appear automatically as they connect.
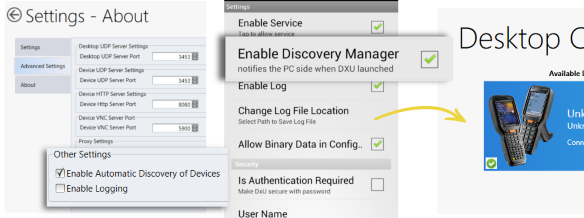
By default, “No Devices Available” will display when no devices announce themselves to DXU either when they connect via USB or when they connect over a network. Simply connecting a Datalogic mobile computer to a network, even on the same subnet as the PC running DXU, will not automatically display as being available. The device must try to connect to DXU, which sends an announcement packet to DXU. However, connecting a device to the PC running DXU via USB will automatically display it in DXU. You may also check the “Enable Automatic Discovery of Devices” checkbox in DXU’s Settings view to automatically see any device that connects to the network, but remember that automatic discovery is restricted to discovering devices only within your PC’s subnet.
To configure a connected device, you simply click its button under Available Devices to load its configuration into DXU.
To return to the DXU main window, click the Back button (generally, a leftward pointing arrow in a circle).
Refresh
This button manually refreshes the display of currently connected devices. This can overcome problems with the automatic display of devices as they connect, and it can remove devices from the list that are not currently connected.

Add Device
This button opens the “Add Device” dialog which allows you to type the IP address of a device. This dialog does not support DNS naming of devices. You can also use a custom TCP port if you have configured your device to use one in DXU Agent. For convenience, this field pre-populates with your PC’s IP subnet. You need only type in the last number of your device’s IP address if it is in the same subnet as your PC.

This dialog allows you to manually connect to devices running DXU Agent that are either inside your PC’s subnet or outside it. The limitation is that devices on other subnets must be on a subnet that is routable from your PC’s subnet. Consult with your network expert for more information.
Once connected, devices that respond to DXU’s query over the network will display in the Available Devices list.
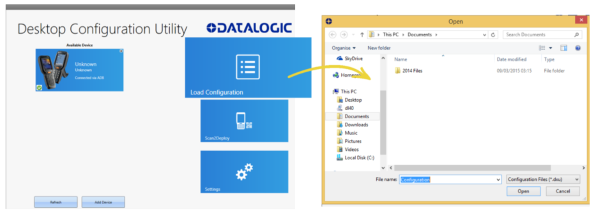
Load Configuration
Clicking the “Load Configuration” button opens a standard file dialog that allows you to explore for and select a DXU configuration file. Loading a configuration allows you to edit a device’s configuration when the device is not connected to DXU. This also allows you to save copies of this configuration to new locations or file names, so you can edit a copy of the configuration while leaving the original configuration unchanged.
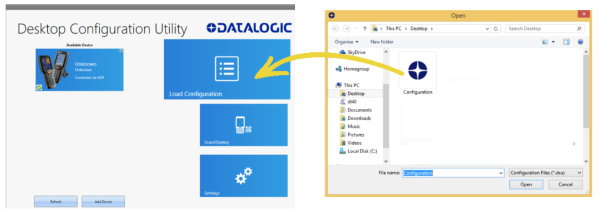
To load a configuration:
-
Click the “Load Configuration” button.
-
Explore to any folder where DXU configuration files are located, then select any configuration file you wish. You can double-click it to streamline opening it.
-
Click the Open button.
Note that the default location is your user directory on your PC, but DXU remembers the last directory you opened a DXU configuration file, and always starts in that directory the next time you wish to open another DXU configuration file.
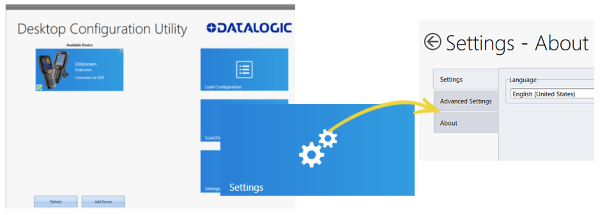
Settings View
The Settings view is opened by clicking the Settings button on DXU’s main view. This view includes controls which should seldom need to be changed, such as the language that DXU displays in, TCP ports used to communicate with remote devices, and the About tab that displays DXU’s version.
Settings Tab
Language Section
The Language section lets you switch the language that strings in DXU are displayed in. The default language is US English, but you may choose Italian, Chinese Simplified, or Chinese Traditional. Additional languages may be added later without notice.
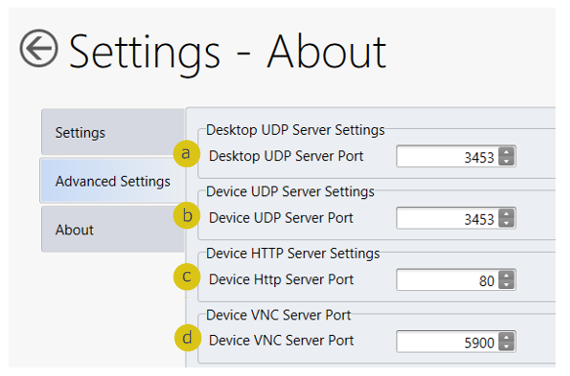
Advanced Settings Tab
The “Advanced Settings” tab lets you change network communications settings that DXU uses to communicate several types of information with remote computers that are being configured.
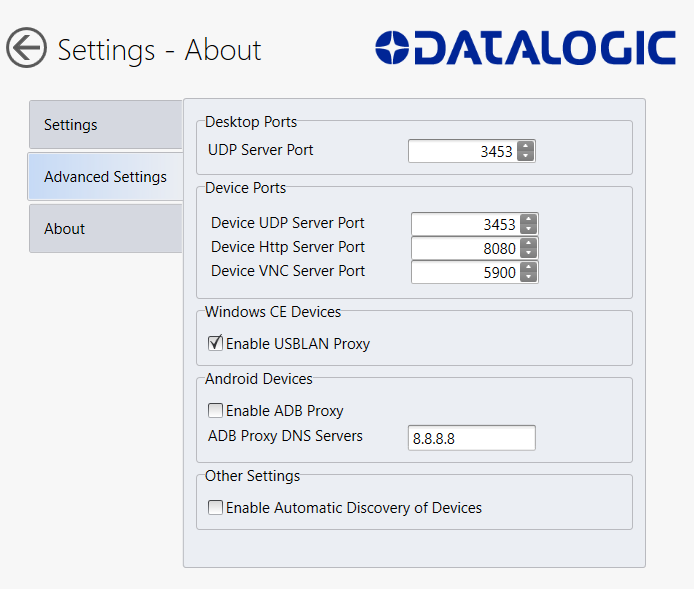
Desktop UDP Service Port
The “Desktop UDP Server Port” filed must be set to the same value as the matching ports on the remote device to ensure communication and remote configuration.
Device UDP Service Port
The “Desktop UDP Server Port” field must be set to the same value as the matching ports on the remote device to ensure communication and remote configuration.
Device HttpServer Port
The “Device HTTP Server Port” field must be set to the same value as the matching ports on the remote device to ensure communication and remote configuration.
Device VNC Server Port
The “Device VNC Server Port” field must be set to the same value as the matching ports on the remote device to enable Remote Control.
Enable USBLAN Proxy
Allows tethering Windows CE devices. For more information, reference the Windows CE Tethering section of this page.
Enable ADB Proxy
Allows a Datalogic Android device connected over USB (via ADB connection) to share the Internet connection of the PC running DXU Desktop. A message will be displayed on the device asking for VPN permission in order to make this feature possible. For more information, reference the Android Tethering section of this page.
ADB Proxy DNS Servers
A list of custom DNS server(s) for the connection to use. Field accepts a comma-separated list of servers (up to 3 servers supported). If no value is specified, a value of 8.8.8.8 will be used (Google DNS).
Enable Automatic Discovery of Devices
Allows DXU Desktop to automatically discover some devices on the network. See Enable Automatic Discovery of Devices for more detail.
About Tab
The About tab displays DXU’s version. This is likely the first question that Datalogic technical support may ask you if you call in with a question. The About tab also displays a link to the online DXU manual.
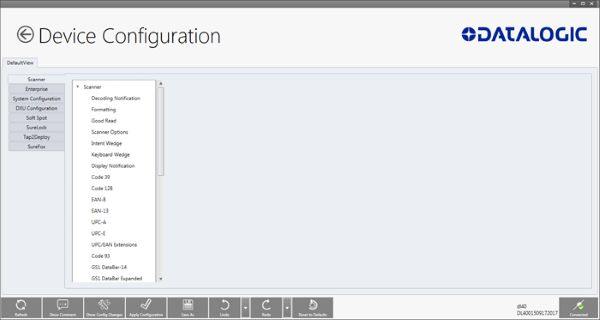
Desktop Configuration Utility - Device View
This is the view you see when you click on a device’s button in the “Available Device” list. It displays a large picture of your device’s model, along with the model name and serial number.
Configure this Device Button
This button lets you configure individual parameter values on your device from DXU. The types of settings include scanner settings, enterprise settings, system configuration settings, DXU Agent configuration settings, Soft Spot settings, Tap2Deploy device-side settings, and SureLock settings. Other settings may be added in the future. Additional settings may be available depending on hardware options installed on your Datalogic mobile computer, and may depend on software installed on your mobile computer.
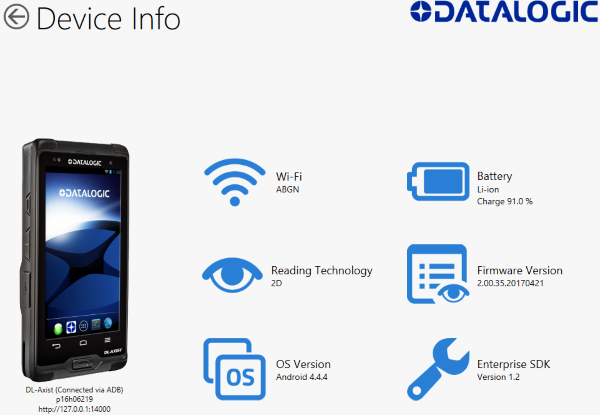
Device Info Button
Clicking this button displays the Device Info view, which displays your device’s Wi-Fi radio capabilities, the type of barcode scanner on the device, the operating system version, battery information, the firmware version installed on your device, and the version of the enterprise SDK, which may be important for troubleshooting.
Remote Control Button
Clicking this button opens a Remote Control window that displays what is visible on the screen of the device you are currently connected to. This window also includes buttons to remotely activate the devices external buttons, and to capture a screen shot of what is visible on its screen.
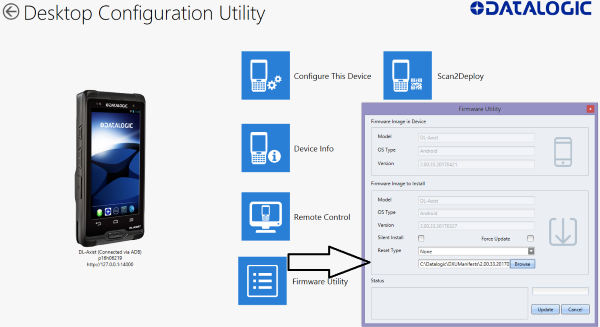
Firmware Utility Button
Clicking this button opens the “Firmware Utility” dialog, which you can use to update the firmware on your device.
Configure DXU
There are many ways to configure DXU, such as changing its language, changing the TCP/IP ports used to communicate with DXU Agent on remote devices, enabling automatic discovery of devices, and resetting DXU’s settings back to their default values.
Configure DXU’s Language
DXU can display its controls in several languages. US English is the default, but you can also select Italian, Chinese Simplified or Chinese Traditional.
To change DXU’s language:
-
In DXU’s main view, click the Settings button.
-
Select the language you prefer in the Language menu.
-
Click the Back button (a leftward pointing arrow in a circle) to return to DXU’s main view.
Configure DXU Communication Settings
You can configure the TCP/IP ports used by DXU to communicate with DXU Agent on Datalogic mobile computers. Configure these settings only if you understand how these changes affect your network. Consult your network expert for more information.
To configure DXU’s UDP and TCP ports:
-
In DXU’s main view, click the Settings button.
-
Click the “Advanced Settings” tab.
-
Edit the port values to match the ports used by DXU Agent on your devices:
-
The “Desktop UDP Server Port” configures the UDP port for the DXU server running on the on the console PC. It is set to UDP port 3453 by default.
-
The “Device UDP Server Port” configures the UDP port for the DXU Agent server running on the device. It is set to UDP port 3453 by default.
-
The “Device HTTP Server Port” configures the TCP port for the DXU Agent server running on the device. It is set to TCP port 80 by default, like common web servers.
-
The “Device VNC Server Port” configures the TCP port for VNC running on the device. It is set to TCP port 5900, like common VNC servers.
-
Click the Back button (a leftward pointing arrow in a circle) to return to DXU’s main view).
Enable Automatic Discovery of Devices
You can enable the automatic discovery of Datalogic mobile computers by DXU. This is not enabled by default.
Do not enable automatic discovery if you have more than one user of DXU console in your subnet, or you risk having two DXU administrators changing the settings on any particular device in your subnet at once.
To enable automatic discovery of devices:
-
In DXU’s main view, click the Settings button.
-
Click the “Advanced Settings” tab.
-
Check the “Enable Automatic Discovery of Devices” checkbox.
-
Click the Back button (a leftward pointing arrow in a circle) to return to DXU’s main view).
Reset Advanced Settings to Defaults
You can reset DXU’s Advanced Settings to their default values. To do this:
-
In DXU’s main view, click the Settings button.
-
Click the “Advanced Settings” tab.
-
Click the “Reset Advanced Settings” button.
-
Click the Yes button to confirm.
-
Click the Back button (a leftward pointing arrow in a circle) to return to DXU’s main view).
Command Line
DXU allows for command line execution, such as via a .bat batch file. This is a convenient method for configuring multiple devices without having to either launch the UI of DXU desktop or the need to configure Simplified Deploy. This configuration can happen via USB or over Wi-Fi (assuming the device has already been attached to the Wi-Fi network).
Usage
DXU command line options are described below.
Apply configuration file to any USB connected devices:
DXU –put <filename.dxu>
Apply configuration file to device of specific IP address:
DXU –put <filename.dxu> -ip <ipaddress>
Apply Simplified Deploy to any USB connected devices:
DXU –man <filename.ini>
Apply Simplified Deploy to device of specific IP address:
DXU –man <filename.ini> -ip <ipaddress>
To output a log file, add the optional parameter:
DXU -log <logfilename>
Device Configuration
DXU configuration files end with the .dxu file extension. They are essentially zip files that contain XML files. If you change the file extension to .zip, you will be able to unzip the file and inspect the XML file inside.
Opening
Files without a password
To load a configuration file saved earlier, do this:
-
Launch DXU.
-
Click the “Load Configuration” file. This will open a standard file dialog.
-
Explore to your configuration file, select it, and click the Open button.
Files with a password
DXU will display a login prompt when you open a configuration file that requires authentication. DXU will also display a login prompt when connecting to a device with a password set in DXU Agent.
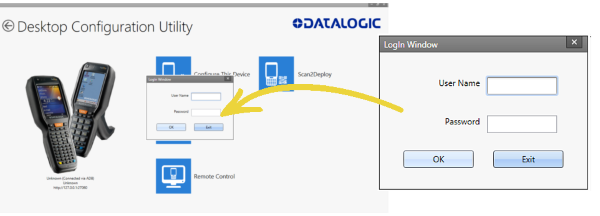
To open a configuration or connect to a device which requires authentication:
-
Open a configuration file or load the configuration from a connected device.
-
Type the user name for this configuration or device into the “User Name” field.
-
Type the password for this configuration or device into the Password field.
-
Click the OK button.
Editing
Offline
You can edit configuration files even when the device they were drawn from are not connected to DXU. Do this:
-
Open your configuration file.
-
Edit any settings you wish.
-
Either save the result to a new configuration file, or just save to the same configuration file.
Online
Once you have added the device to Desktop Configuration Utility, you can click on the listed device under Available devices and use Configure This Device option to start configuring the device. There is also an option to add comments on all the listed settings.
To configure a device that is directly connected via USB:
-
Launch DXU.
-
Connect your Datalogic mobile computer to your PC via a USB cable.
-
Click the button for your connected device in the “Available Device” list.
-
Click the “Configure This Device” button.
-
Configure any settings you wish.
-
Save changes to a configuration file of you do not wish to apply them to your device.
-
Apply the configuration changes to your device is this is what you want to do.
To configure a device that is connected over the network (either Ethernet or Wi-Fi):
-
Launch DXU.
-
Connect your Datalogic mobile computer to DXU manually, using Scan2Deploy labels, or using automatic discovery. (See instructions for these methods in this section.)
-
Click the button for your connected device in the “Available Device” list.
-
Click the “Configure This Device” button.
-
Configure any settings you wish.
-
Save changes to a configuration file of you do not wish to apply them to your device.
-
Apply the configuration changes to your device is this is what you want to do.
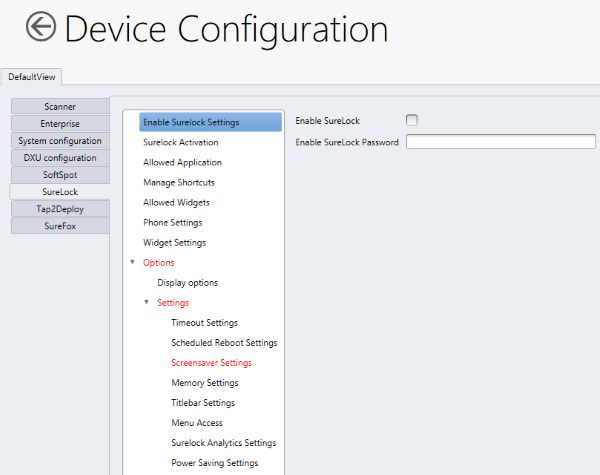
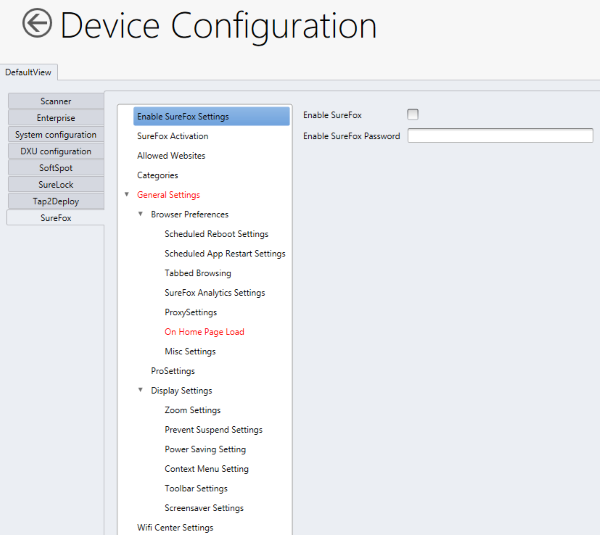
Configuring SureLock and SureFox
For Datalogic Android devices, device and browsing lockdown can occur using SureLock and SureFox, respectively. These lockdown settings can be set via the DXU desktop. There are two important prerequisites to configuring these settings when creating a DXU configuration file.
-
The EULA on the device must first be accept. This can be performed by first launching SureLock or SureFox on the device and accepting the EULA on the device. Future versions of DXU Desktop will allow you to remotely accept this EULA just once for your entire installation.
-
The “Enable SureLock Password” and/or “Enable SureFox Password” fields must have the current password. The Default password is “0000”.
For SureLock:
And for SureFox:
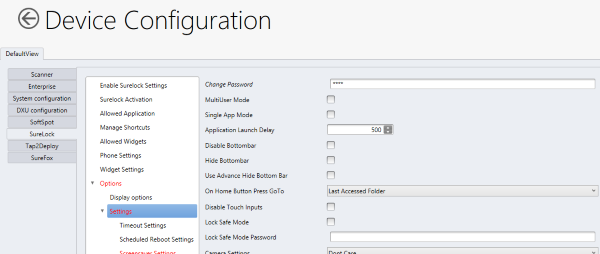
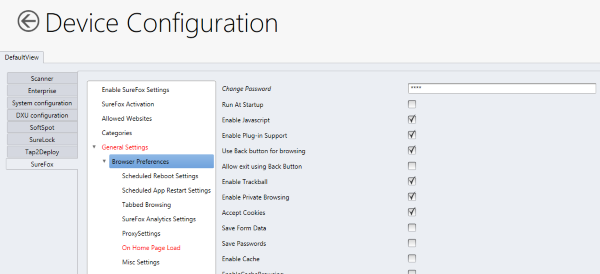
Changing the SureLock and/or SureFox Password
To Change the SureLock and/or SureFox password, after completing the above steps, you can enter the new password in the “Change Password” field.
For SureLock:
For SureFox:
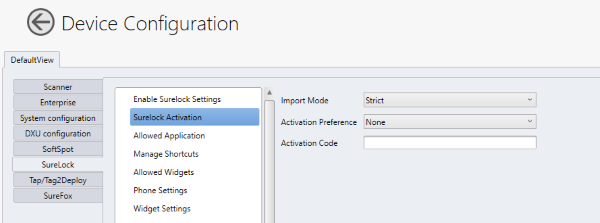
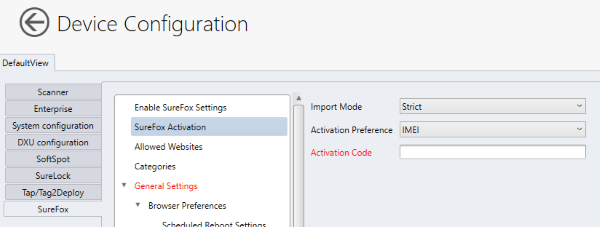
Activating the SureLock and/or SureFox License
The activation codes for SureLock and SureFox, provided by 42Gears™, cannot be used directly by DXU to active your fleet of devices. First, they must be converted into an encrypted activation code.
To activate the SureFox/SureLock license using DXU, users need to enter the encrypted activation code in the “Activation Code” field. To get the encrypted activation code, users will need to manually activate the license on one device and then extract the encrypted activation code and use this encrypted code to activate SureFox/SureLock on other devices from DXU.
For SureLock:
For SureFox:
Below are the steps to get the encrypted activation code, if you have the unencrypted activation code.
-
On the device, open the SureFox/SureLock app and then click on the screen five times to open the SureFox/SureLock settings. Users will be prompted to enter the password after tapping the screen five times to open the settings.
-
Manually activate the SureFox/SureLock (Settings > About SureFox / About SureLock > Activate).
-
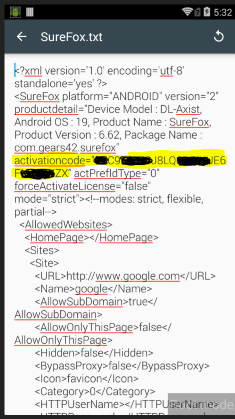
After activating the license, export the settings to file (Settings > Import/Export Settings > Export to File).
You can select the path where you want to save the settings on the device and the filename. But make sure to change the file extension from ‘.settings’ to ‘.txt’ before saving the settings.
-
Then open the settings file and extract the encrypted activation code, after “activationcode=”.
Add Comments
Comments can be added to any tab, node, or parameter in the “Device Configuration” view. Comments are indicated with a small text balloon icon.
To add a comment:
-
Open a configuration file or load the configuration from a connected device.
-
Click the “Configure This Device” button.
-
Right-click on any tab, node, or parameter, then select the “Add comment” command in the context-sensitive menu.
-
Type your comment.
-
Click the OK button to save. A small text balloon will appear next to the item you commented on.
To edit a comment:
-
Right-click on any item with a small comment icon.
-
Select the “Edit comment” command in the context-sensitive menu.
-
Edit your comment.
-
Click the OK button to save.
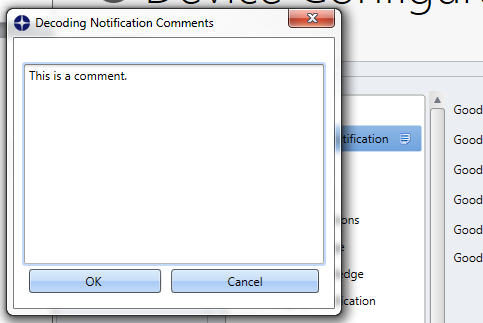
Show Comments
You can show all comments in a configuration file in one handy table by doing this:
-
Open a configuration file or load the configuration from a connected device.
-
Click the “Configure This Device” button.
-
If do not have comments in this configuration file, add several.
-
Click the “Show Comments” button in the button bar.
You can select and edit comments in this table by double-clicking on the Comment field. Simply click the exit button (X) to close the dialog.
Saving
From within the Device Configuration view, click either the Save or Save As button in order to save a configuration file. Assuming you click Save As, or this is the first time you are saving the file, the Save Configuration window will be displayed.
Save Configuration window
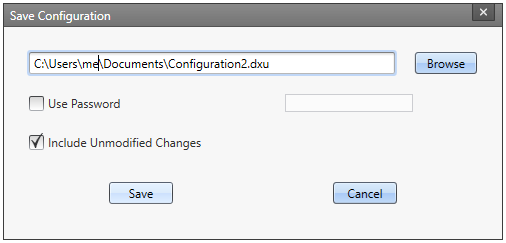
Once you have provided a filename and the any desired optional parameters (described below) and are done, click the Save button. and the Click the OK button to dismiss the confirmation dialog.
Filename
You may type the path and file name in the field, or you can click the Browse button to use a standard file dialog to explore to the folder of your choice and type the filename.
Use Password
The checkbox is unchecked by default, indicating no password is required to open the saved file. If checked, the password field to the right becomes enabled and you can enter a password. Anyone who opens this configuration file in the future will be required to provide the correct password in order to open the file.
Include Unmodified Changes
It is highly recommended to leave Include Unmodified Changes checked, as unchecking this field results in unreliable behavior when applying configuration files to devices. See pros and cons section below for more details.
The checkbox is checked by default, indicating that all settings, regardless if they have been changed from their default values or not, will be included in the saved file. Unchecking this field results in only including settings that have been changed from defaults in the current editing session.
Include Unmodified Changes
The Include Unmodified Changes checkbox within the Save Configuration window deserves a more in depth analysis, as it has a large effect on the behavior of saved DXU configuration files.
First, it's helpful to be aware of the Show Config Changes button in the bottom ribbon of the Device Configuration editor. It will help you to reliably determine what fields have been modified from defaults in the current editing session.
Pros and Cons
Checked pros
- All settings will be applied on devices
- All settings are saved in the configuration file regardless of default value.
Checked cons
- Some setting defaults are likely not what you want. For example, by default, Wi-Fi is disabled, and no networks are configured. Any existing networks you have configured on a device will be wiped out.
- Larger file size
Unchecked pros
- Smaller file size
- Allows you to only apply the fields that you want, regardless of current state on device
Unchecked cons
- If the value selected for a field is the default value, it won't reliably be saved to file or be applied to devices.
- Even if the value selected for a field is not the default value, there is a good chance it still won't be applied. This is largely due to known issues in both in DXU PC and DXU Agent.
- You can't edit and re-save such files with Include Unmodified Changes left unchecked.
- When editing a configuration file saved with Include Unmodified Changes unchecked, even if you do check Include Unmodified Changes after making your changes, only settings that were modified when the file was created can be changed. See Example below.
Example
The following example demonstrates some of the problems that when editing files originally saved with Include Unmodified Changes unchecked.
- Enable Code 39 and EAN-13 manually on the device, in the device's Settings menu
- Use DXU to reading the device's configuration, either by using a USB cable or over Wi-Fi
- Disable Code 39 within DXU
- Save as > uncheck Include Unmodified Changes > filename CFG1.dxu
- Close DXU
- Reopen DXU and load the CFG1.dxu file
- Disable EAN-13 in DXU
- Save as > uncheck Include Unmodified Changes > filename CFG2.dxu
- Again, Save as > check Include Unmodified Changes > filename CFG2full.dxu
- Close DXU
- Reopen DXU and load CFG2.dxu
- EXPECTED: EAN-13 is disabled, Code 39 is disabled
- OBSERVED: EAN-13 is disabled, Code 39 is still enabled
- Close DXU
- Reopen DXU and load CFG2full.dxu
- EXPECTED and OBSERVED: Code 39 and EAN-13 are disabled
Device Info
View Device Info for a Connected Device
You can view information about a device that is connected to DXU. This information includes the capabilities of the device’s Wi-Fi radio, the type of barcode scanner it has, the OS version, the battery’s type and state of charge, the firmware version, and the version of the Datalogic Enterprise SDK.
To view information about the device you are connected to:
-
Load the configuration from a connected device.
-
Click the “Device Info” button.
-
Click the Back button (a leftward pointing arrow in a circle) to return to DXU’s main view).
View Device Info Recorded in a Configuration File
You can view information about the device from which a configuration file was extracted. This information includes the capabilities of the device’s Wi-Fi radio, the type of barcode scanner it has, the OS version, the battery’s type and state of charge, the firmware version, and the version of the Datalogic Enterprise SDK.
To view information about the device from which a configuration file was extracted:
-
Open a configuration file or load the configuration from a connected device.
-
Click the “Device Info” button.
-
Click the Back button (a leftward pointing arrow in a circle) to return to DXU’s main view).
Remote Control
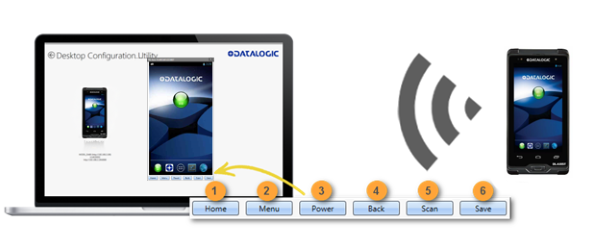
Remote Control lets you see what is displayed on the screen of a connected Datalogic mobile computer. This window also includes buttons to remotely activate the device’s external buttons, and to capture a screen shot of what is visible on its screen. Note that clicking a button on screen does not physically press a button, or even trigger it electrically, but instead sends an event message in the system as if you had pushed a physical key or tapped a physical button on the touch screen. Remote Control works through the magic of software.
Unlock the Screen Using Remote Control
You can unlock the screen by dragging your mouse on the Remote Control screen in the same manner as a user swiping on the device’s screen.
To start Remote Control and unlock a device’s screen:
-
Launch DXU.
-
Connect the device to DXU either directly using USB or on the network via Wi-Fi or Ethernet.
-
Click the device’s button in the “Available Device” list.
-
Click the “Remote Control” button.
-
If the device is suspended, with its screen off, click the Power button (3) at the bottom of the Remote Control window.
-
Click on the lock icon and drag it rightward, releasing it over the unlocked lock icon at the right edge of the Remote Control window.
1. Home Button
At the bottom of the Remote Control window, the Home button activates the device’s Home button, which switches the display to the Home screen.
2. Menu Button
At the bottom of the Remote Control window, the Menu button activates the device’s menu. Some applications have a menu, and others do not, so this feature depends on which application is active when you click the Menu button.
3. Power Button
At the bottom of the Remote Control window, the Power button toggles the device’s power state as if you had pressed the device’s Power button. If the device is awake, clicking the Power button will turn off the screen, locking the screen if the device is configured to do that. If the device’s screen is off, clicking the Power button will resume the device as if you pushed the device’s Power button.
4. Back Button
At the bottom of the Remote Control window, the Back button takes the device to the previously viewed screen or application as if you had tapped the device’s Back button.
5. Scan Button
At the bottom of the Remote Control window, the Scan button activates the device’s barcode scanner as if you had pressed one of the Scan keys on the device. There are some limitations: the scanner will not scan if there is no application running that can receive its data; the scanner cannot scan if the Camera application is showing its live preview or taking a photograph or recording a video; and the scanner will not scan if none of the device’s scan buttons are configured to scan. However, in general if you have your device configured to scan barcodes and an application is receiving the data, then the Scan button will trigger a scan remotely.
6. Save a Screenshot of Remote Device
At the bottom of the Remote Control window, the Save button takes a screen shot of the remote computer and prompts to save it to your PC. The default path that DXU saves screen shots is your user folder.
Set a VNC Password
VNC is a standard protocol for remotely controlling PC’s and other computers, and it allows the use of a password to prevent unwanted remote access to computers.
The VNC password must match between DXU console and DXU Agent on the device or a connection will not be made.
Set a VNC Password in DXU Agent
You can set a password for VNC in DXU Agent. This field allows VNC communication to be authenticated, so prying eyes cannot remotely connect to and control your Datalogic mobile computer. This field is blank by default.
To set or edit a VNC password in DXU Agent:
-
Resume your mobile computer and unlock its screen.
-
Launch the DXU Agent application.
-
Tap the Menu button (⋮) to display the menu.
-
Tap the Settings button.
-
Uncheck the Enable Service checkbox.
cautionYou must uncheck Enable Service before you can change any setting in DXU Agent.
-
In the “VNC Settings” section, tap the Password button.
-
Type a password into the field. It can be numbers, letters, or some punctuation characters.
-
Tap the OK button.
-
Check the “Enable Service” checkbox.
-
Clean up by tapping the Home button.
To authenticate Remote Control when a password is set on the device:
-
Launch DXU.
-
Connect the device to DXU either directly using USB or on the network via Wi-Fi or Ethernet.
-
Click the device’s button in the “Available Device” list.
-
Click the “Remote Control” button.
-
Type the device’s VNC password into the field, and then click the OK button.
Set or Edit the VNC Authentication Password from DXU
You can change a device’s VNC password from DXU. It is a configuration parameter in the Device Configuration view. To do this:
-
Open a configuration file or load the configuration from a connected device.
-
Click the “Configure This Device” button.
-
Click the “DXU Configuration” tab.
-
Click the “General Settings” node in the middle pane.
-
Type a password into the “VNC Authentication Password” field, or edit the value in that field.
-
Note: the value in this field is encrypted for security. Once entered, it will be displayed as asterisks.
-
Click the Back button (a leftward pointing arrow in a circle) to return to DXU’s main view).
Firmware Utility
You can update a Datalogic mobile computer’s firmware from DXU. DXU provides several options, such as performing a “Silent Install” where no user interaction is required on the device, and performing a “Force Update” where the firmware is reinstalled even if the device reports that it already has the same version installed. Also, you can specify whether a factory data reset or an enterprise reset is performed after updating the firmware, or if the update will simply reboot the device without performing an update.
DXU firmware update is not the only way to update firmware on Datalogic mobile computers. DXU’s firmware update capability works only with connected devices. If you need a method that can update firmware on many devices remotely, especially if they are not connected to a network, then other methods may suit your needs better. Please consult your device’s user reference guide for other firmware update methods.
Customarily firmware update is referred to as “update” on Datalogic mobile computers that use Microsoft Windows operating systems, and it is referred to as “upgrade” on Datalogic mobile computers that use the Android operating system. These terms are used because the creators of these operating systems use these terms, but the terms essentially mean the same thing.
Silent Install
This option allows you to perform an image update that does not require any user interaction on the device. If left unchecked, the user will be prompted to perform the update, but they have the option to cancel the update. This checkbox is not checked by default.
Force Update
This option allows you to perform a full upgrade of the firmware regardless of what is installed on the device. By default, the firmware upgrade utility will compare the version of the image file with what is already running on the device, and if they match it will skip updating. This is done to save time and prevent inconvenience for most users in the field. However, in rare circumstances a firmware image can become corrupted in the field, and this option allows a DXU administrator to perform a full firmware upgrade, disregarding the version reported by the device.
Factory Data Reset After Installing Firmware
A factory data reset is a full reset of the device intended to return it to the condition it would be in if it were just leaving the factory. This reset deletes all user data and settings, deletes installed applications, and resets the device’s real-time clock to its default date and time. Data on microSD cards is not affected.
Enterprise Reset After Installing Firmware
An enterprise reset is much like a factory data reset, except that it does not reset Wi-Fi settings. In almost every other way, it resets the device, including restoring flash memory to factory defaults, removing installed applications, deleting user data, and resetting the date and time to default levels.
Update Firmware on a Connected Device
You must first connect to a device to update its firmware with DXU. The connection can be either with USB, or over a network using Wi-Fi or Ethernet.
To perform a firmware update with DXU:
-
Launch DXU.
-
Connect the device to DXU either directly using USB or on the network via Wi-Fi or Ethernet.
-
Click the device’s button in the “Available Device” list.
-
Click the “Firmware Utility” button.
-
Click the Browse button to open a standard file dialog to browse for and select a suitable firmware image file.
cautionDXU will automatically filter your view of file types to those that are compatible with your device.
-
Navigate to your firmware image file, select it, and click the Open button.
-
(Optional) Check the “Silent Install” checkbox if you wish to perform a firmware update that does not require user interaction on the device.
-
(Optional) Check the “Force Update” checkbox if you wish to force a complete reinstallation of this image on the device.
-
(Optional) Select an option from the “Reset Type” menu if you wish to perform a factory data reset after the image update finishes, or if you wish to perform an enterprise reset after the image update finishes, or if you just want to have the device reboot without resetting at all.
-
Click the Update button.
Device Tethering
Windows CE
- Tethering for Windows CE devices can be enabled using the
Enable USBLAN Proxysetting underSettings>Advanced Settings.
This feature allows you to connect X4 and X3 generation CE devices running in USBLAN mode to a PC running DXU via USB cable and access HTTP servers located on the attached network (LAN or Internet). The following limitations are present:
-
The PC must not have any other services using UDP port 53
-
The PC must not have any other services using TCP port 80
-
HTTPS connections are not supported
-
No feedback is provided if UDP port 53 or TCP port 80 is already in use on your system. It is recommended that you use the resmon.exe tool built into Windows to determine if other processes are using these ports before using this feature.
Why can't Internet Explorer on the device access websites?
Check the following items to figure out why IE on the device isn't working over a USBLAN connection.
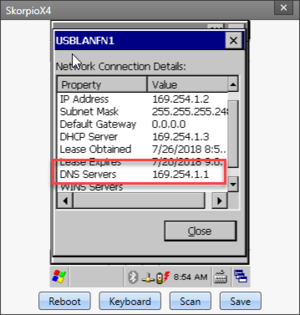
Verify DNS Server field is present
Beginning with DXU release 1.8.162, the USBLAN driver will set a DNS Servers value on the connected device. On the device, follow these steps to verify that the DNS Servers field is set:
- Make sure you are in USBLAN mode on the device in the PC Connection Control Panel, and that you have a USB cable connected to the PC.
- Double click the USBLAN icon
- Click Details...
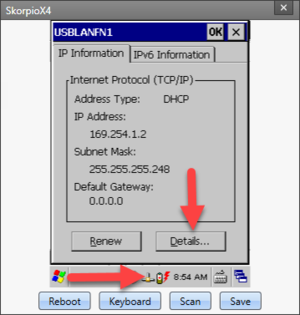
- Verify DNS Servers is set to 169.254.1.1, which is the IP Address of the connected PC.
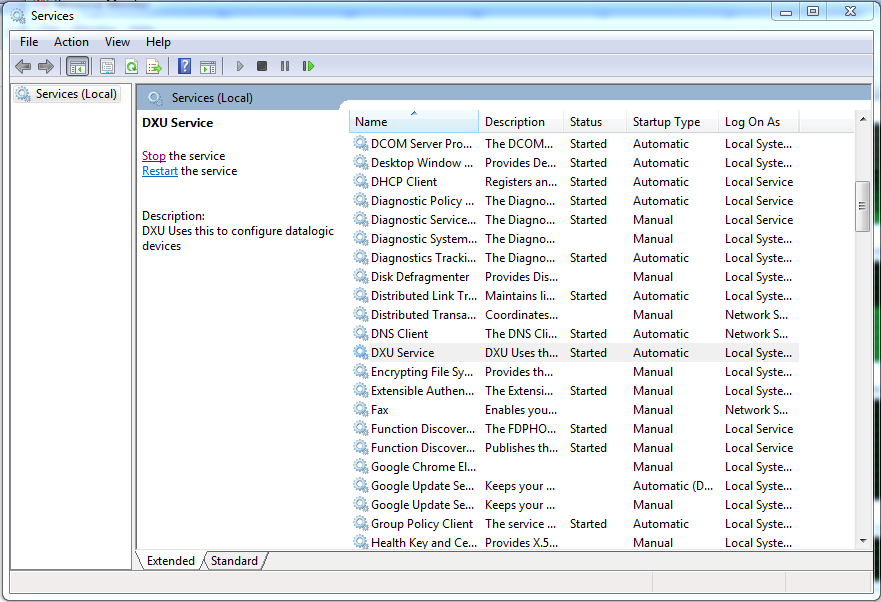
Verify DXU Service is running
- Go to Start > Run > services.msc
- Verify DXU is listed as running.
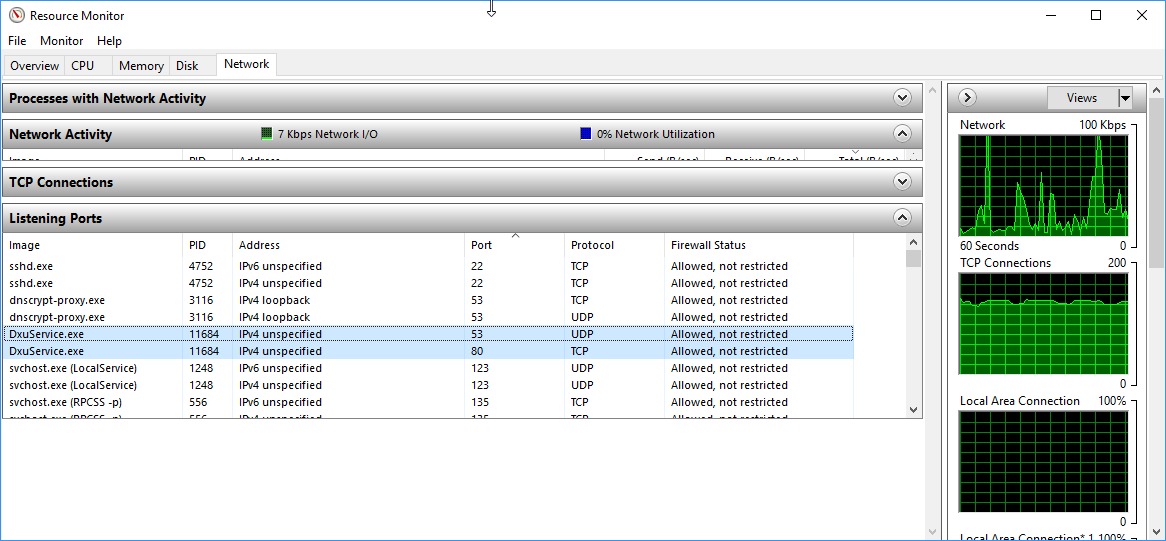
Verify HTTP and DNS proxy are running on PC
- On the connected PC, open Start and type 'Resmon'. Hit enter.
- Navigate to the network tab > Listening Ports
- Verify DxuService.exe is listed twice:
- with Port: 53, Protocol UDP
- with Port: 80, Protocol TCP
Android
- Tethering for Android devices can be enabled using the
Enable ADB Proxysetting underSettings>Advanced Settings.
This feature allows devices running Android 5 and above, connected to DXU Desktop over ADB via USB cable to access HTTP(S) servers located on the attached network, as well as on the Internet using the internet connection of DXU Desktop.
Scan2Deploy
DXU Desktop can be used for creating Scan2Deploy barcodes. This feature is targeted for use with Windows CE devices.
Barcode Generation
From the main Device Configuration Utility page, click the Scan2Deploy (Beta) button:
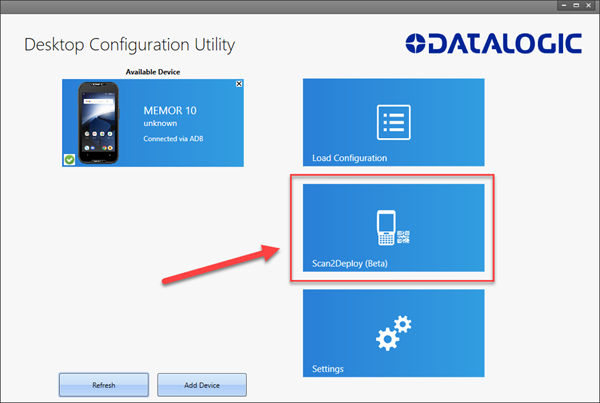
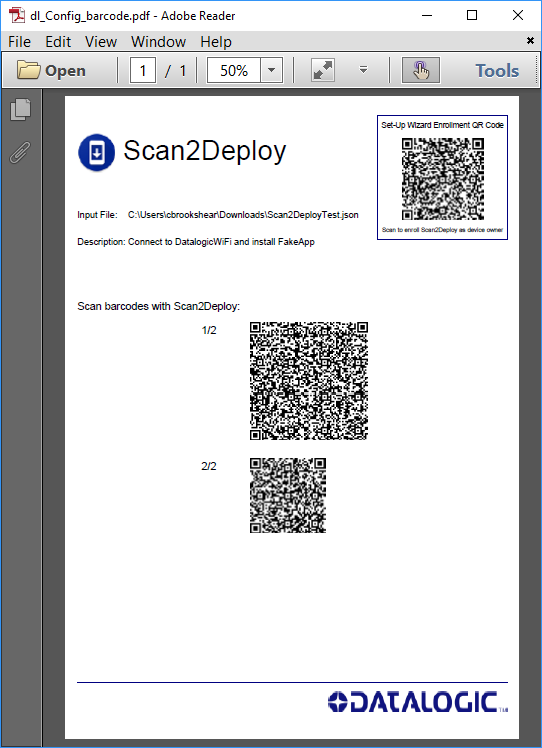
Once you are at the Scan2Deploy UI page, you can browse to the JSON file you have created and then click Generate PDF.
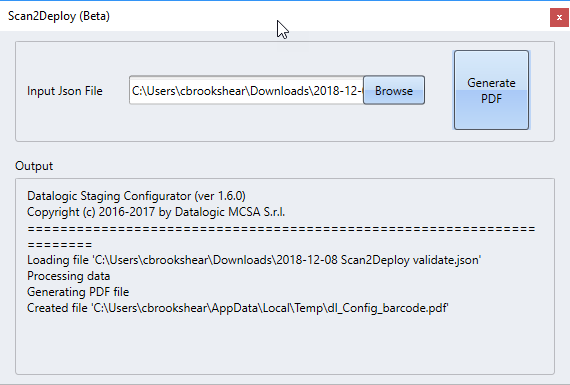
A PDF page will open up in your default PDF viewer, ready for you to print, save, or scan.
dl_config.exe
dl_config.exe is a Windows Command Prompt based application. It's what DXU Desktop uses "under the hood" to create Scan2Deploy barcodes. When you install DXU Desktop, by default dl_config.exe will be located at the following location:
C:\Program Files (x86)\Datalogic\DXU\Plugins\dl_config.exe
Command Output
$ dl_config.exe
Datalogic Staging Configurator (ver 1.7.1524)
Copyright (c) 2016-2017 by Datalogic MCSA S.r.l.
======================================================================
Usage: dl_config.exe <input-file> <output-file> [options]
Options:
  --outputfolder=<string>
  --barcodetype=<1d|2d>
  --barcode1dlimit=<integer>
  --barcode2dlimit=<integer>
  --legacymode=<boolean>
  --version=<integer>
  --enroll=<boolean>
  --description=<string>
  --encodeonly=<boolean>
Example
The following command will create a PDF document with a Scan2Deploy barcode, including a description of Store 123 Wi-Fi and apps:
dl_config.exe input.json output.pdf --description="Store 123 Wi-Fi and apps"
Required parameters
input-fileis a JSON document, driving the application behavioroutput-fileis a PDF document that will be created based on the contents of theinput-file.
Options
outputfolder: Deprecatedbarcodetype: Controls the output barcode type to use, that is QR code (2d) or CODE-128 (1d)- The default value is2d.barcode1dlimit: Maximum data length for each generated 1D barcode. The default value is50.barcode2dlimit: Maximum data length for each generated 2D barcode. The default value is500.legacymode: Deprecatedversion: Controls the data encoding version and should not be used unless necessary. The default value is0for 1D barcodes, and-1for 1D barcode.enroll: Android Only Boolean flag instructing DL-Config to generate Scan2Deploy Device Owner Enrollment QR code in output file. The default value isfalse.description: Free-form description field. Description will be displayed in header of output file. The default description isnone.encodeonly: *Android Only Boolean flag. If set totrue, the encoded data generated by the tool will only be displayed on the command line for easy copy-paste. This data can be included in a start-activity intent to Scan2Deploy Android, effectively allowing you to "scan" without a barcode and programmatically apply a given configuration. The filename provided foroutput-filewill be ignored and a PDF file will not be created. You can therefore enter any value foroutput-file(-anddummyare valid values for instance) The default value forencodeonlyisfalse.