DXU Android
Downloads
DXU Agent comes preloaded on Datalogic Android devices, but we also make the latest released version available here in the Releases section on the DXU Android Github page.
Settings
The most important thing to remember about changing DXU Agent settings is that the DXU Agent Service must be disabled before changing settings, and it must be enabled again after changing settings to put those settings into operation.
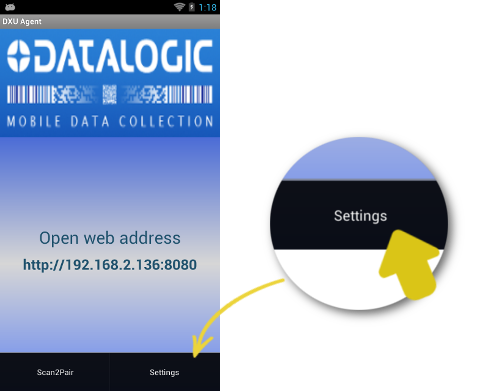
Find these settings in the DXU Agent application on the mobile computer.
-
Launch the DXU Agent application.
-
Tap the Menu button (⋮) to display the menu.
-
Tap the Settings button.
-
Tap the
Settingsbutton.
Here is a brief overview of each of the settings:
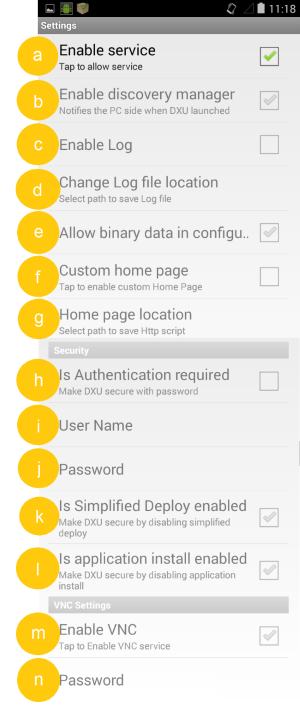
a. Enable Service
This checkbox is the key to changing any settings in DXU Agent. Unchecking this checkbox allows you to edit almost all settings. Checking this checkbox puts those settings into operation. This checkbox is checked by default.
Also, if for some reason you want to disable DXU on a mobile computer, you can uncheck this checkbox to prevent DXU from changing settings. Doing this will not undo settings changes already made, but it will prevent DXU from getting the mobile computer’s settings and will prevent DXU from changing any settings on the mobile computer.
b. Enable Discovery Manager
This checkbox controls the mobile computer’s broadcast of its name and device type over USB or over a network to the DXU desktop application. When checked, DXU will automatically see when the mobile computer connects to USB or over a network. When unchecked, DXU will not display when the mobile computer connects to USB or over the network. This checkbox is checked by default.
c. Enable Log
This checkbox enables DXU Agent’s logging capability. When enabled, logs are written to the log file location. Logging can be helpful when diagnosing problems, but at a slight cost of slowing DXU and consuming slightly more power. This checkbox is not checked by default.
d. Change Log File Location
This field allows you to specify where DXU Agent’s log file is kept on your Datalogic mobile computer. The default location on Android OS mobile computers is /storage/sdcard0, which is located in the device’s on-board flash memory. This location is a persistent location, so log files stored here are safe if the mobile computer reboots. If a MicroSD card is used, you may wish to specify that logs be kept on the card if the card has greater capacity than on-board flash. MicroSD cards are also persistent.
e. Allow Binary Data in Configuration
This checkbox allows a few types of binary data to be transmitted from the Datalogic mobile computer to DXU, and from DXU to the mobile computer. Checking this checkbox allows binary data to be sent to or from the binary computer in the configuration file. Unchecking this checkbox blocks transfer of binary data in the configuration file. Binary data can be quite large compared to other configuration data, so if performance is important, the administrator can uncheck this checkbox to make configuration files smaller and quicker to apply. This checkbox is checked by default.
f. Custom Home Page
This checkbox enables a locally hosted web page that can be displayed on the device when network connectivity fails. Checking this checkbox will set browsers’ error pages to the home page located in the “Home Page Location” folder location. Unchecking this checkbox returns browsers to their default error behavior when they cannot load any particular web page.
g. Home Page Location
This field stores the path to a locally hosted web page that can be displayed on the device when network connectivity fails. This functionality is enabled by the “Custom Home Page” checkbox. This folder can be located in either internal flash (/storage/sdcard0) or in a MicroSD card (/storage/sdcard1). The default value is /storage/sdcard0.
h. Is Authentication Required
This checkbox enables authentication to launch DXU Agent, and puts the User Name and Password into operation. When enabled, the user must correctly type both the user name and password to gain access to DXU Agent’s settings. This checkbox is not checked by default.
Note that these settings are also enforced by the DXU desktop application when it loads the configuration from the device. The DXU administrator will be prompted to type this user name and password. Once authenticated, the DXU administrator can edit the user name and password in DXU and apply these to devices.
i. User Name
This field stores the user name used to log into DXU Agent. It is put into effect when the “Is Authentication Required” checkbox is checked. The default value is “admin” and you can change it.
j. Password
This field stores the password used to log into DXU Agent. It is put into effect when the “Is Authentication Required” checkbox is checked. The default value is “0000” and you can change it.
k. Is Simplified Deploy enabled
This checkbox enables Simplified Deploy. This is a security setting that could be used, for example, to allow use of Simplified Deploy only once as an out-of-box experience.
l. Is application install enabled
This checkbox enables installing applications with Simplified Deploy. This is a security setting that can be used to disable the feature of allowing Simplified Deploy to install customer applications onto the device.
m. Enable VNC
This checkbox enables VNC, a cross-platform standard for remotely controlling computers. DXU uses VNC to implement its Remote Control feature. Unchecking this checkbox blocks DXU from remotely observing and controlling the device. Checking this checkbox enables this feature. This checkbox is checked by default.
n. VNC Password
This field allows VNC communication to be authenticated, so prying eyes cannot remotely connect to and control your Datalogic mobile computer. This field is blank by default.
Advanced Settings
These settings must match settings in DXU Desktop in order for the DXU desktop application to communicate with Datalogic mobile computers. A mismatch will result in a communication failure, which will block all configuration functionality.
Change these settings only if you understand precisely any advantage you may gain by doing so. Most users will not realize any advantage from changing these port settings.
Find these settings in the DXU Agent application on the mobile computer.
To configure DXU Agent’s Advanced Settings, do this:
-
Launch the DXU Agent application.
-
Tap the Menu button (⋮) to display the menu.
-
Tap the Settings button.
-
Tap the
Advanced Settingsbutton.
As with the DXU Agent settings listed above, these advanced settings can
only be changed when the Enable Service checkbox is unchecked.
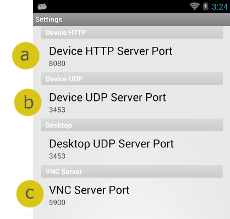
a. Device HTTP Server Port
This field configures the HTTP port for the DXU server running on the device. It is set to TCP port 80 by default, the same as most web servers.
b. Device UDP Server Port
This field configures the UDP port for the DXU server running on the device. It is set to UDP port 3453 by default.
Desktop UDP Server Port
This field configures the UDP port for communicating to the DXU desktop server. It is set to UDP port 3453 by default.
c. VNC Server Port
This field configures the HTTP port for VNC running on the device. It is set to TCP port 5900 by default, which is the customary port used by most VNC clients for connections.
Version
This page displays the DXU Agent version number.
Logging
DXU Agent can log its activities. When enabled, logs are written to the log file location. Logging can be helpful when diagnosing problems, but at a slight cost of slowing DXU Agent and consuming slightly more power. This checkbox is not checked by default.
You can specify where DXU Agent’s log file is kept on your Datalogic mobile computer. The default location on Android OS mobile computers is /storage/sdcard0, which is located in the device’s on-board flash memory. This location is a persistent location, so log files stored here are safe if the mobile computer reboots. If a MicroSD card is used, you may wish to specify that logs be kept on the card if the card has greater capacity than on-board flash. MicroSD cards are also persistent.
To enable DXU Agent logging on your Datalogic mobile computer:
-
Resume your mobile computer and unlock its screen.
-
Launch the DXU Agent application.
-
Tap the Menu button (⋮) to display the menu.
-
Tap the Settings button.
-
Uncheck the “Enable Service” checkbox.
You must uncheck “Enable Service” before you can change any setting in DXU Agent.
-
Check the “Enable Log” checkbox.
-
Check the “Enable Service” checkbox.
-
Clean up by tapping the Home button.
To specify where log files are stored on your Datalogic mobile computer:
-
Resume your mobile computer and unlock its screen.
-
Launch the DXU Agent application.
-
Tap the Menu button (⋮) to display the menu.
-
Tap the Settings button.
-
Uncheck the “Enable Service” checkbox.
-
Tap the Change Log File Location button.
-
Type a valid path on your device into the “Change Log File Location” field, and then tap the OK button.
-
(Optional, but desired if you wish to log to this new location) Check the “Enable Log” checkbox.
-
Check the “Enable Service” checkbox.
-
Clean up by tapping the Home button.
You must uncheck “Enable Service” before you can change any setting in DXU Agent.
Security
Configurations and configuration files can require authentication to open and apply. DXU implements an invisible sort of authentication by automatically applying a default user name and password to every DXU configuration and configuration file. You can display an authentication prompt whenever anyone attempts to connect to one of your Datalogic mobile computers with DXU, and change both the user name and password as well to increase security of your devices.
Enable Authentication in DXU Agent
You can ensure that users are prompted to enter a user name and password to open a configuration file in the DXU console or to DXU Agent’s Settings window on a Datalogic mobile computer. This capability is enabled with a single checkbox in DXU Agent.
To enable authentication:
-
Resume your mobile computer and unlock its screen.
-
Launch the DXU Agent application.
-
Tap the Menu button (⋮) to display the menu.
-
Tap the Settings button.
-
Uncheck the “Enable Service” checkbox.
-
Check the “Is Authentication Required” checkbox.
-
Check the “Enable Service” checkbox.
-
Clean up by tapping the Home button.
You must uncheck “Enable Service” before you can change any setting in DXU Agent.
To authenticate while opening DXU Agent’s Settings window:
-
Resume your mobile computer and unlock its screen.
-
Launch the DXU Agent application.
-
Tap the Menu button (⋮) to display the menu.
-
Tap the Settings button.
-
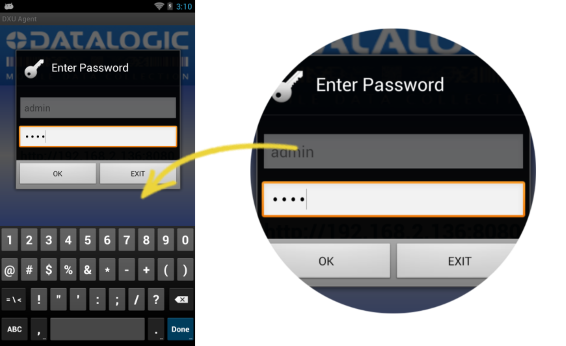
Type your password into the “Enter Password” field, and then tap the OK button.
Change the User Name in DXU Agent
Editing the user name adds an extra layer of complication to authentication. The default user name is “admin.” Changing the user name adds another piece of information that a hacker must enter correctly to access the configuration in DXU.
To change the User Name:
-
Resume your mobile computer and unlock its screen.
-
Launch the DXU Agent application.
-
Tap the Menu button (⋮) to display the menu.
-
Tap the Settings button.
-
Uncheck the “Enable Service” checkbox.
-
Tap the “User Name” button.
-
Delete the contents of the field, and type a new user name.
-
Tap the OK button.
-
Check the “Is Authentication Required” checkbox.
-
Check the “Enable Service” checkbox.
-
Clean up by tapping the Home button.
You must uncheck “Enable Service” before you can change any setting in DXU Agent.
Change the Password in DXU Agent
Editing the password ensures the simplest means to keep untrusted actors out of DXU Agent configuration settings. The default password is “0000.”
To change the Password:
-
Resume your mobile computer and unlock its screen.
-
Launch the DXU Agent application.
-
Tap the Menu button (⋮) to display the menu.
-
Tap the Settings button.
-
Uncheck the “Enable Service” checkbox.
tipYou must uncheck “Enable Service” before you can change any setting in DXU Agent.
-
Tap the Password button.
-
Delete the contents of the field, and type a password.
-
Tap the OK button.
-
Check the “Is Authentication Required” checkbox.
-
Check the “Enable Service” checkbox.
-
Clean up by tapping the Home button.