Visual Formatter Page (Basic Concepts)
The Visual Formatter page allows users to create formatting rules to manipulate the barcode data received from the scanner. The user can decide which inputs and outputs to consider and create a connection that goes from the specified inputs towards the outputs, passing through some nodes, each representing a specific operation. This data flow is used to manipulate the input data in order to obtain the desired output.
See the following sections on the next page for a more in-depth explanation of the different components available in the Visual Formatter:
This section (Basic Concepts) explains the Visual Formatter project structure, as well as the types and components available in the tool.
Project Structure
Visual and Standard Formatter
The Visual Formatter is a tool used to manipulate a barcode decoded by the scanner. It does so by presenting a user interface in which you can connect different blocks and execute operations on the input barcode, with the purpose of modifying it in the desired way.
Prior to the introduction of the Visual Formatter, the Datalogic Android devices provided only a Standard Formatter, a component used to manipulate the barcode with some customizations that the user can change from the Settings of the device. Below are a list of features implemented by the Standard Formatter:
- Prefix and suffix customization.
- Group Separator replacement.
- Removal of non-printable characters from the barcode.
- Parsing and output of a different barcode type, for example recognizing and outputting a Code 32 from a Code 39 barcode.
- Check digit management.
- Charset management.
While executing the Visual Formatter, the Standard Formatter can be skipped or executed before/after the Visual Formatter, depending on the requirements of the project. The methods used to control the Standard Formatter execution are described in the sections below.
Visual Formatter Items
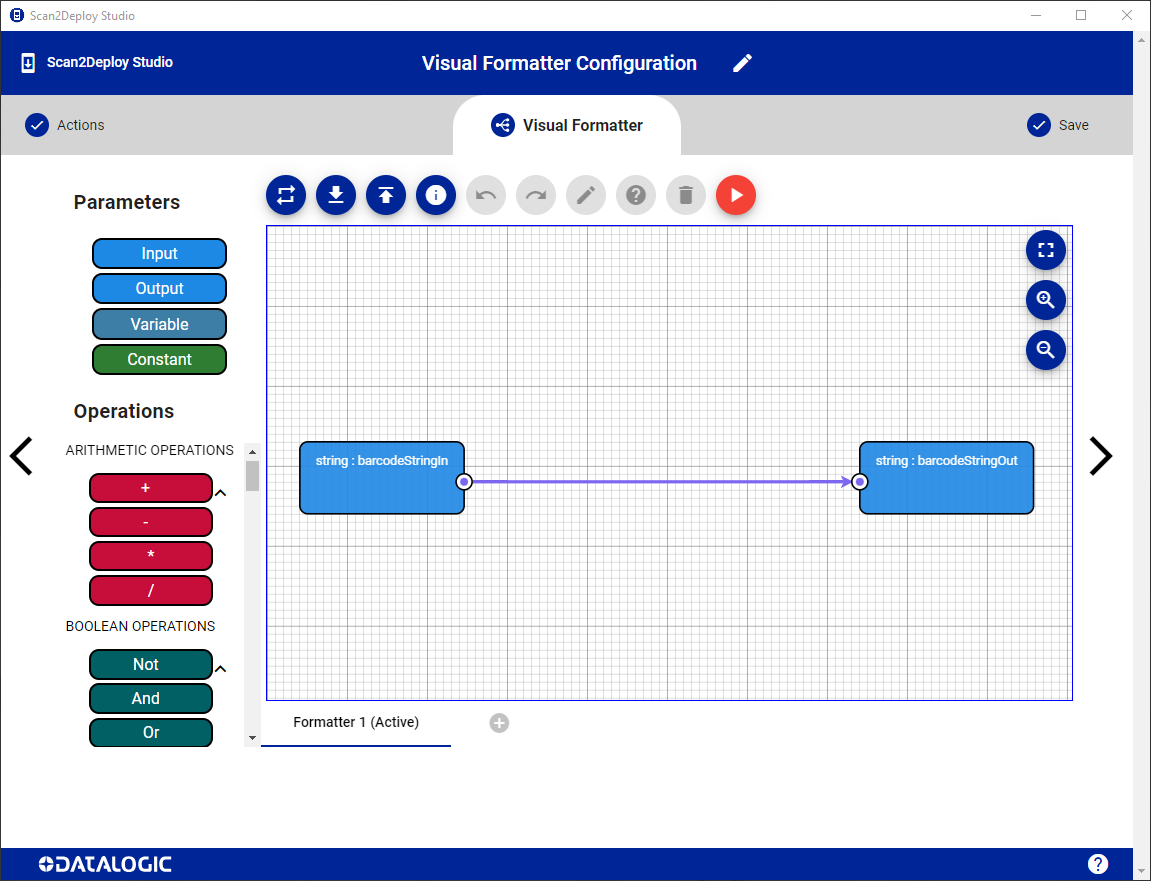
After selecting the Visual Formatter option from the actions list, a Visual Formatter project is created and a starting chart is provided. This chart represents a single item in the Visual Formatter project. There are 2 possible types of item available for use inside a Visual Formatter project:
- Formatter: Item used to manipulate the barcode data received from the scanner, as well as other scan events when supported, using the Operations available.
- Dispatcher: Item used to allow for a cleaner management of the Formatter items. With the dispatcher it is possible to specify a list of Formatter items to execute, including the Standard Formatter, with a given order. This enables the execution to be separated in different items, simplifying the overall flow and the readability of the charts. It can also act as a validator for the data received. The dispatcher is available starting from Feature Level 1.
The project represents a list of items. Every project starts with a single Formatter item, but can be expanded by adding more formatters and dispatchers as desired by the user. The item that will execute can be changed at runtime using the Datalogic SDK APIs.
Data Types
Supported data types (also available as arrays):
| Name | Color | Represents |
|---|---|---|
| String | A text. | |
| Number | A numeric value that can be integer or floating point. | |
| Boolean | True or false value, generally used to check on some condition. | |
| Enum | Depending on the sub-type, it is used to set a value from a predefined list of constants. Mainly used to represent the BarcodeType or the Formatter enumerations. |
For input connectors, you can specify a data type value directly inside the nodes representing various Operations. You can also drag and drop the Constant block of the Parameters tab inside the flowchart area, as shown in the video below.
Inputs, Outputs and Variables
Inside the chart you can specify some input and output nodes. The inputs are set before executing the Visual Formatter item (usually after a barcode is read from the scanner or after a specific scanner event) and will be manipulated depending on the connected operations. The outputs are set at the end of the chart's execution, if they have been connected to other nodes. Some inputs and outputs are predefined, but the user can also add custom nodes, called Properties in the Datalogic SDK. These nodes can be inputs, outputs or variables representing both an input and an output node (for example, a counter that is incremented after each successful read). You can add inputs, outputs or variables by dragging and dropping the Input, Output or Variable block of the Parameters tab inside the flowchart area, as shown in the video below.
Predefined
Inputs
| Name | Type | Available in | Represents |
|---|---|---|---|
| barcodeStringIn | String | Formatter & Dispatcher | The barcode text read from the scanner. If the item chart is a formatter executed through a dispatcher and it is not the first in the list of formatters to be executed, the barcodeStringIn input is actually set to be equals to the barcodeStringOut output of the previous formatter item. |
| barcodeTypeIn | Enum BarcodeType | Formatter & Dispatcher | The barcode symbology. If the current chart represents a formatter executed through a dispatcher and it is not the first in the list of formatters to be executed, the barcodeTypeIn input is actually set to be equals to the barcodeTypeOut output of the previous formatter item. |
| eventTypeIn | Enum EventType | Formatter & Dispatcher | The type of event that caused the current item to be executed. By default, the project only manages the BARCODE EventType (returned when a barcode is read), but it can be set to manage also the events for START, STOP and TIMEOUT of the scanner decoding session. Changing the managed events can be done from the Item Info menu (found in the UI Controls). More details on these events can be found in the Datalogic SDK documentation. This input and its management are available starting from Feature Level 3. |
Outputs
| Name | Type | Available in | Represents |
|---|---|---|---|
| barcodeStringOut | String | Formatter | The barcode text as it has been modified by the tool. If it is not included in the chart, it will assume the value of barcodeStringIn. |
| barcodeTypeOut | Enum BarcodeType | Formatter | The barcode symbology as it has been modified by the tool. If it is not included in the chart, it will assume the value of barcodeTypeIn. |
| executeStandardFormatterOut* | Boolean | Formatter | True to also run the Standard Formatter after the Visual Formatter has executed, false to skip it. If not included in the chart, it will assume the true value. This parameter is ignored when the formatter is executed from a dispatcher, to avoid executing the standard formatter multiple times. In this case, the standard formatter can be specified directly in the list of formatters executed from the dispatcher. |
| propagateResultOut | Boolean | Formatter | True to propagate the result in the system and eventually receive the resulting barcode, false to not propagate, thus ignoring the barcode data completely. If not included in the chart, it will assume the true value. |
| formattersOut | Enum Formatter[] | Dispatcher | Array of formatters that will be executed sequentially in the order specified. The Formatter enumeration is updated depending on the available formatters, with the STANDARD formatter always available. If it is not included in the chart, it will be considered as an empty array. |
| actionsOut | string[] | Formatter | Array of action ids, used to execute a list of actions in the given order. The action ids are created using the operations available under the Actions category. Each id identifies the type of action that created it, with the parameters provided as input of the specific Action block used. Examples of actions are: sending a barcode result, sending a key event or sending an intent. The actions are available starting from Feature Level 3. |
* Value not always considered during execution.
Custom (Properties)
In order to create custom nodes, also called properties, you need to specify the following info:
- Id: The identifier of the property, unique inside the flowchart. A suffix will be added during the creation of the node, depending on the direction. An input node will have the suffix "In", an output node the suffix "Out" and the variable node will create 2 separate nodes, one for the input and the other for the output.
- Name: The name of the property.
- Description: A description related to the purpose of the property (optional).
- Type: Data type of the property.
- Default Value: The default value that the property will assume in case it is not set during the execution of the chart.
- Hide from UI: If enabled, the property will be hidden from the device Settings, preventing the user to modify its value if not through the Datalogic SDK APIs.
All the custom nodes will be available in the Datalogic SDK APIs through the list of properties available for every item the project contains. The custom nodes are available starting from Feature Level 2.
Operations
Each operation is represented by a node with inputs and outputs. The inputs and outputs are shown as circles (or a rhombus for arrays) with an internal color that represents the type of input/output to use and have a unique name. The inputs can be connected to other nodes outputs, as well as to input blocks or constants, while the outputs work in the opposite way. The inputs can also be initialized without an explicit connection by using the UI component to the right of the name. Below the graphical representation of the SubString node is shown.

Operation nodes are divided into subsections depending on the type of operation executed. Every subsection has a different color to help during the editing of the formatter flow.
Arithmetic Operations
| Name | Appearance | Description |
|---|---|---|
| + | 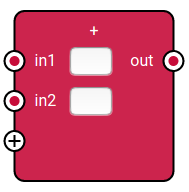 | Addition between numbers (2 minimum). |
| - |  | Subtraction between 2 numbers. |
| * | 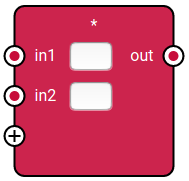 | Multiplication between numbers (2 minimum). |
| / | 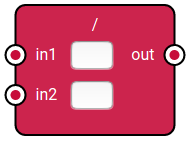 | Division between 2 numbers. |
Boolean Operations
| Name | Appearance | Description |
|---|---|---|
| Not | 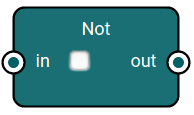 | Inverts the value of the input boolean. |
| And | 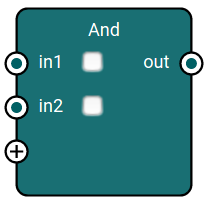 | Executes a logical AND between multiple booleans (2 minimum). |
| Or | 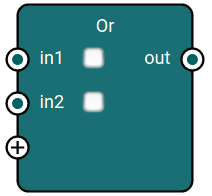 | Executes a logical OR between multiple booleans (2 minimum). |
| Nand | 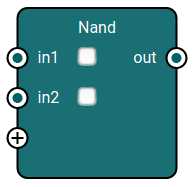 | Executes a logical NAND between multiple booleans (2 minimum). |
| Nor | 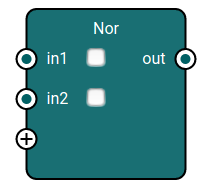 | Executes a logical NOR between multiple booleans (2 minimum). |
Inequality Operations
| Name | Appearance | Description |
|---|---|---|
| >= | 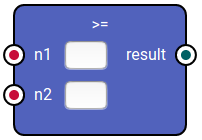 | Checks if n1 >= n2, with n1 and n2 both numbers, returning a boolean with the result of the check. |
| > | 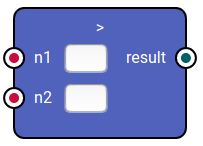 | Checks if n1 > n2, with n1 and n2 both numbers, returning a boolean with the result of the check. |
| == | 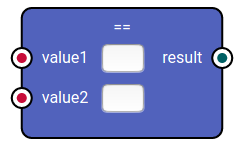 | Equality check, works also for types different than numbers. |
| < | 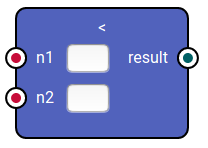 | Checks if n1 < n2, with n1 and n2 both numbers, returning a boolean with the result of the check. |
| <= | 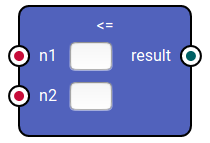 | Checks if n1 <= n2, with n1 and n2 both numbers, returning a boolean with the result of the check. |
| != | 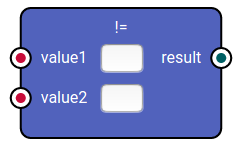 | Inequality check, works also for types different than numbers. |
String Operations
| Name | Appearance | Description |
|---|---|---|
| Remove First | 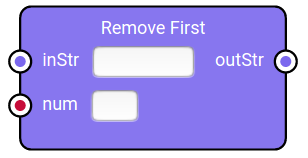 | Removes the first num characters from inStr. |
| Remove Last | 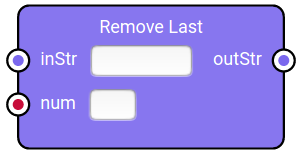 | Removes the last num character from inStr. |
| Remove At | 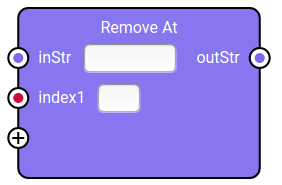 | Removes from inStr the characters in the positions provided as indices (the first character is at index 0). |
| Remove Sub String | 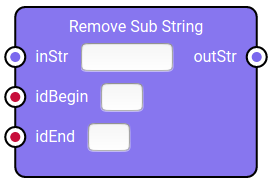 | Removes a substring contained in the input string. The number idBegin represents the index of the first character to remove, this number starts from 0 to remove the first character of the string (1 for the second and so on). The characters are removed until the index idEnd is reached, with the character at idEnd being included in the output string. Example: taking into consideration the string "Welcome", with idBegin = 2 and idEnd = 4 the output string will be "Weome". |
| Sub String | 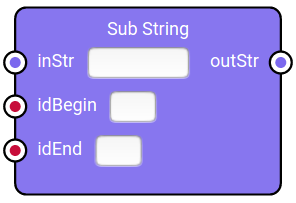 | Creates a substring starting from the input string. The number idBegin represents the index of the first character to take to form the substring, this number starts from 0 to include the first character of the string (1 for the second and so on). The number idEnd is the index of the first character of the string to exclude from the substring, meaning this character will not be included in the output string. Example: taking into consideration the string "Welcome", with idBegin = 2 and idEnd = 4 the output string will be "lc". |
| Length | 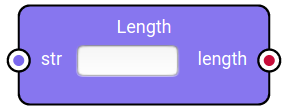 | Returns the length of str. |
| Contains |  | Checks if str contains the string match and returns true in that case. |
| Concat | 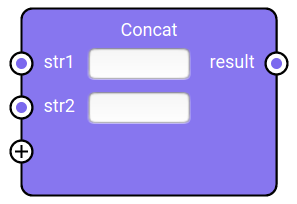 | Concatenates multitple strings (minimum 2). |
| Repeat | 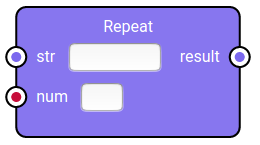 | Repeats the input string str for num times. |
| Index Of | 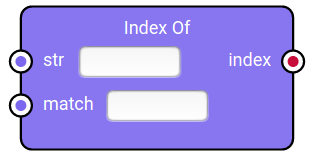 | Returns the index of the first occurrence of match inside str. This index represents the beginning of the first match string found in str. It returns -1 if no occurrence is found. |
| Last Index Of | 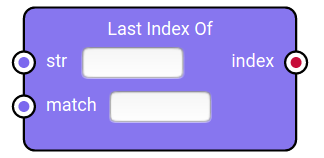 | Returns the index of the last occurrence of match inside str. This index represents the beginning of the last match string found in str. It returns -1 if no occurrence is found. |
| Search | 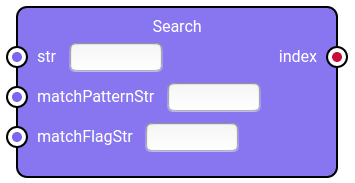 | Works as Index Of but the match is a regular expression. The complete regular expression is formed as "/matchPatternStr/matchFlagStr". Example: to search for the index of the first character from A to Z, the expression will be /[A-Z]/ (matchPatternStr = "[A-Z]", matchFlagStr = ""). |
| Replace | 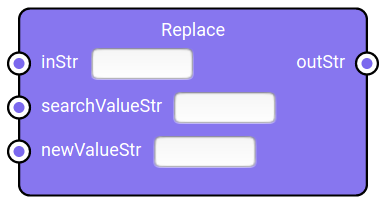 | Replaces the first occurrence of searchValueStr (found inside inStr) with newValueStr. |
| Replace With RegEx | 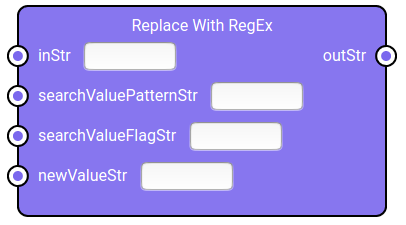 | Replaces values (found inside inStr) corresponding to the regular expression formed by searchValuePatternStr and searchValueFlagStr with newValueStr. The complete regular expression is formed as "/searchValuePatternStr/searchValueFlagStr". Example: to replace all characters from A to Z with X, the expression will be /[A-Z]/g (searchValuePatternStr = "[A-Z]", searchValueFlagStr = "g", newValueStr = "X"). |
| Replace All | 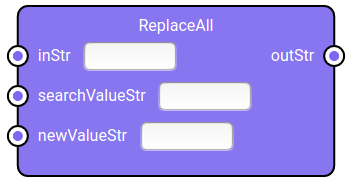 | Replaces every occurrence of searchValueStr (found inside inStr) with newValueStr. |
| To Upper Case | 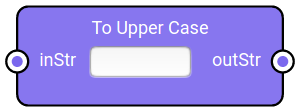 | Converts the input string to uppercase letters. |
| To Lower Case | 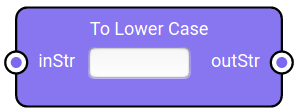 | Converts the input string to lowercase letters. |
| Trim | 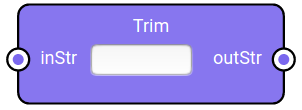 | Removes whitespaces at the start and at the end of the input string. |
| Trim Start | 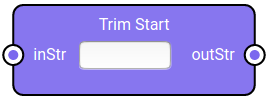 | Removes whitespaces at the start of the input string. |
| Trim End | 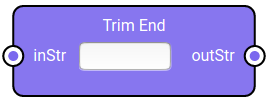 | Removes whitespaces at the end of the input string. |
| Trim Char | 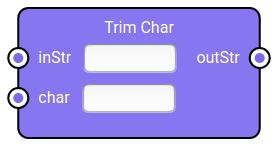 | Removes all the occurrences of the specified character at the start and at the end of the input string. |
| Trim Char Start | 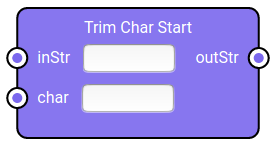 | Removes all the occurrences of the specified character at the start of the input string. |
| Trim Char End | 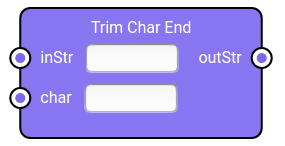 | Removes all the occurrences of the specified character at the end of the input string. |
| Char At | 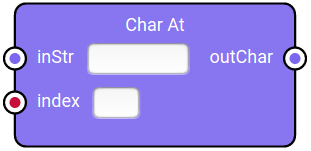 | Extract a single character from the string, specified by the input index (starting from 0 for the first character). |
| Split | 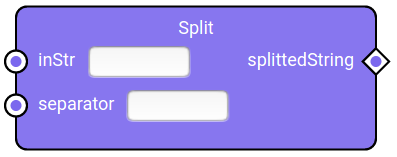 | Splits the string using the provided separator. The output is an array of strings. |
| Substitute Chars | 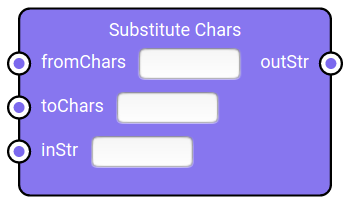 | Substitutes every character of fromChars found inside inStr in the corresponding character of toChars (found in the same position). Example: inStr = "abc", fromChars = "ab", "toChars" = "de", outStr = "dec". |
| Starts With | 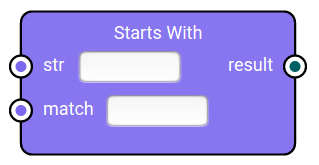 | Returns true if str starts with match, false otherwise. |
| Ends With | 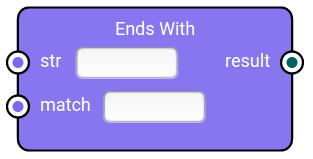 | Returns true if str ends with match, false otherwise. |
| Count | 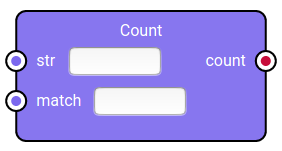 | Returns the number of occurrences of the match string inside str. |
| Reverse | 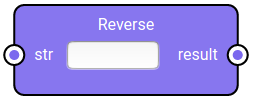 | Reverses the characters in the input string. |
| Create Min Length String | 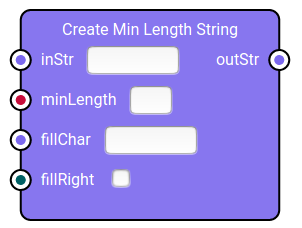 | If the length of inStr is lower than minLength, append fillChar to inStr for the number of times required to reach the desired length. The character is appended to the right if fillRight is set to true, otherwise it will be appended to the left. In case the length of inStr is >= minLength, the input string will be returned unmodified. |
| Is Alpha | 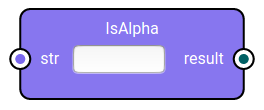 | Returns true if str only contains alphabetic characters, false otherwise. |
| Is Numeric | 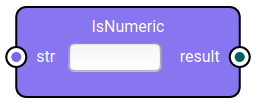 | Returns true if str only contains numbers, false otherwise. |
| Is AlphaNumeric | 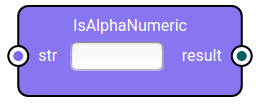 | Returns true if str only contains alphanumeric characters, false otherwise. |
| To Number | 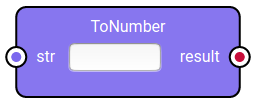 | Converts the input string into a number if possible, otherwise it will return an undefined value. |
| To Boolean | 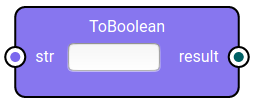 | Converts the input string into a boolean if possible, otherwise it will return an undefined value. |
| To String | 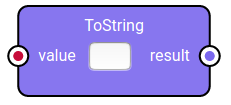 | Converts the input value into a string. |
Array Operations
| Name | Appearance | Description |
|---|---|---|
| Length | 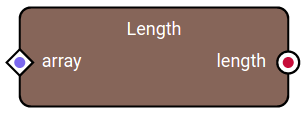 | Returns the length of the input array. |
| Get | 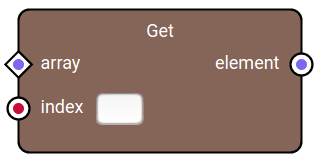 | Returns the element at the given index inside the input array. If no element is found it will return an undefined value. |
| Add | 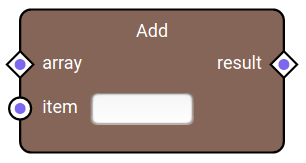 | Adds the specified item inside the input array, returning the array with the new item added inside. |
| Add All | 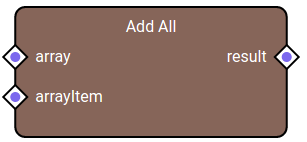 | Adds an array inside the input array, returning the array with the new items added inside. |
| Remove At | 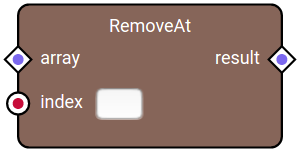 | Removes the element at the specified index from the input array, returning the array with the removed element as a result. |
| Create | 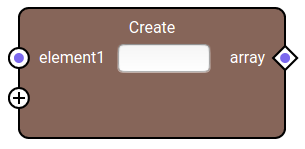 | Creates an array starting from a variable number of elements. |
NOTE: The array type is identified as a rhombus in the input or output connectors of a block.
Conditions
| Name | Appearance | Description |
|---|---|---|
| If | 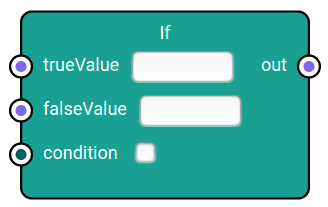 | Chooses a value based on the input condition (boolean). If condition is true, the trueValue set as input is passed as output, otherwise the falseValue will be taken. The inputs called trueValue and falseValue, as well as the output called out, can have a different type that will be selected during the node creation. |
| Switch | 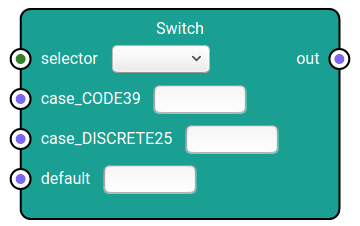 | Works as a switch condition. The selector of the switch can have a specified data type. The case corresponding to the value of the selector will be moved to the output. If the selector value is not found in the case list, the default case will be considered. The case values can also have a specified data type. |
Actions
| Name | Appearance | Description |
|---|---|---|
| Send Barcode | 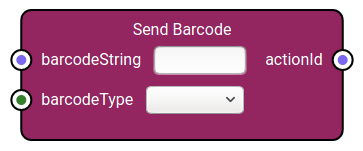 | Creates an action used to send a barcode result, taking as input the barcode string and the barcode type. |
| Send Key Event | 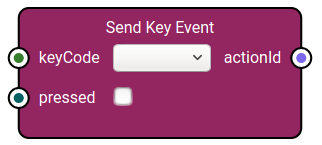 | Creates an action used to send a key event, taking as input the associated key code and a boolean to indicate if the key is pressed or released. The key codes available are a subset of the ones managed in Android and are sent similarly to what is done by a physical keyboard on the device. |
| Send Key Event Number | 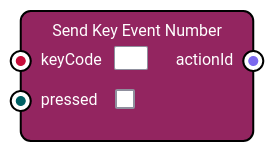 | Creates an action used to send a key event, taking as input a number representing the associated Android key code and a boolean to indicate if the key is pressed or released. The key code is sent similarly to what is done by a physical keyboard on the device. |
| Send Key Sequence | 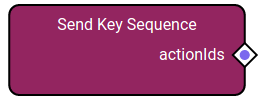 | Creates a list of actions used to send multiple key events, allowing for a delay after each key event. The rest of the parameters is the same as the Send Key Event action, with the difference that the editing is done through a dialog instead of connecting the key codes as input. |
| Send Intent | 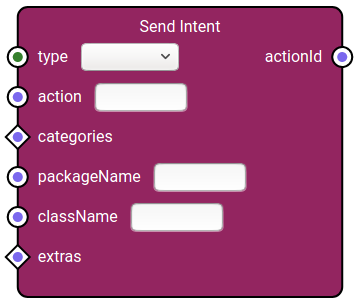 | Creates an action used to send an intent, specifying different inputs (not all mandatory): type of intent (start activity, start service or send broadcast), action, categories, package and class name of the receiver and eventually the extras (that can be created using the Create Extra operation). |
| Wait | 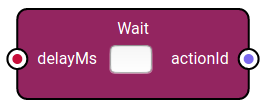 | Creates an action used to wait an amount of milliseconds specified as input. The delay can go from 1 to 100 milliseconds. |
Utility
| Name | Appearance | Description |
|---|---|---|
| Passthrough | 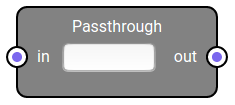 | Utility block used only for a graphical purpose, in order to make it easy to create connections between blocks that are far away. |
| Create Extra |  | Creates an extra of different type, taking as input the extra name and its value. The result is a string that, added in an array, can be used as input of the Send Intent operation (in the extras field). |
| Get GS1 Field Value | 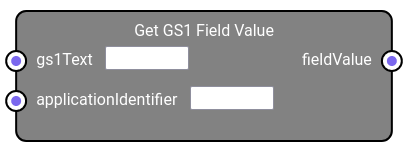 | Given a GS1 formatted string and an application identifier as input, it retrieves the value of the specified application identifier, when found. If the value is not present, an empty string will be returned. |
Feature Level
All visual formatter projects contain a number representing the feature level of the specific project. The feature level is used to verify the compatibility of the created project with a specific device and depends on the features included in the project. This number is always visible in the project info dialog.
The currently supported feature levels are:
- Feature Level 0: Supports only simple formatter charts.
- Feature Level 1: Can include dispatcher items.
- Feature Level 2: Can include custom inputs/outputs/variables.
- Feature Level 3: Can include the actionsOut output (used to execute additional actions aside from the usual barcode, such as sending key events or intents) as well as the eventTypeIn input (used to manage the start, stop and timeout of the decoding session).
- Feature Level 4: Includes the utility block called "GS1 Get Field Value", used to parse a GS1 element string in order to retrieve a value for a specified application identifier. Note that this block executes on the Scanner Service side, meaning that in the Visual Formatter debugging tool the results will be predefined as "VALUE_" concatenated with the application identifier specified.
Below the table with the scanner service versions from where the specific feature level has been introduced:
| Feature Level | Scanner Service Version |
|---|---|
| 0 | 1.3.2.01 r5 |
| 1 | 1.3.2.01 r10 |
| 2 | 1.3.2.01 r10 |
| 3 | 2.2.0.10 r2 |
| 4 | 2.2.0.38 r1 |
The following instead shows when support for a given feature level was added to a device's firmware:
- Skorpio X5
- Memor 20
- Memor 11
- Memor 10
- Memor 1
- Memor K
- Joya 22
- Joya A6
| Firmware version | Release date | OS version | Feature level |
|---|---|---|---|
| 3.26.001 | 2024-01-15 | 11 | 3 |
| 3.25.001 | 2023-12-14 | 11 | 3 |
| 3.24.001 | 2023-11-08 | 11 | 3 |
| 3.23.001 | 2023-10-17 | 11 | 3 |
| 3.22.002 | 2023-09-22 | 11 | 3 |
| 3.21.001 | 2023-08-28 | 11 | 3 |
| 3.20.002 | 2023-07-17 | 11 | 3 |
| 3.19.001 | 2023-06-06 | 11 | 3 |
| 3.17.001 | 2023-05-11 | 11 | 3 |
| 3.16.001 | 2023-04-19 | 11 | 3 |
| 3.15.001 | 2023-03-16 | 11 | 3 |
| 3.14.001 | 2023-02-16 | 11 | 3 |
| 3.13.001 | 2023-01-10 | 11 | 3 |
| 3.11.001 | 2022-12-14 | 11 | 3 |
| 3.10.001 | 2022-11-09 | 11 | 3 |
| 3.09.001 | 2022-10-10 | 11 | 3 |
| 3.06.004 | 2022-07-18 | 11 | 3 |
| 2.13.003 | 2022-10-17 | 10 | 3 |
| 2.12.008 | 2022-04-20 | 10 | 3 |
| 2.11.006 | 2021-11-10 | 10 | 3 |
| 2.10.005 | 2021-07-09 | 10 | 2 |
| 2.09.052 | 2021-03-30 | 10 | 2 |
| 2.08.050 | 2021-02-04 | 10 | 2 |
| Firmware version | Release date | OS version | Feature level |
|---|---|---|---|
| 3.26.001 | 2024-01-15 | 11 | 3 |
| 3.25.001 | 2023-12-14 | 11 | 3 |
| 3.24.001 | 2023-11-08 | 11 | 3 |
| 3.23.002 | 2023-10-17 | 11 | 3 |
| 3.22.001 | 2023-09-28 | 11 | 3 |
| 3.21.001 | 2023-08-28 | 11 | 3 |
| 3.20.002 | 2023-07-17 | 11 | 3 |
| 3.19.001 | 2023-06-06 | 11 | 3 |
| 3.17.001 | 2023-05-11 | 11 | 3 |
| 3.16.001 | 2023-04-18 | 11 | 3 |
| 3.15.001 | 2023-03-16 | 11 | 3 |
| 3.14.001 | 2023-02-16 | 11 | 3 |
| 3.13.001 | 2023-01-10 | 11 | 3 |
| 3.11.001 | 2022-12-14 | 11 | 3 |
| 3.10.001 | 2022-11-09 | 11 | 3 |
| 3.09.001 | 2022-10-10 | 11 | 3 |
| 3.08.003 | 2022-09-27 | 11 | 3 |
| 3.07.001 | 2022-07-29 | 11 | 3 |
| 3.04.002 | 2021-12-09 | 11 | 3 |
| 1.11.01 | 2022-07-18 | 9.0 | 3 |
| 1.10.08 | 2022-07-18 | 9.0 | 3 |
| 1.09.06 | 2021-08-31 | 9.0 | 3 |
| 1.07.08 | 2021-03-23 | 9.0 | 2 |
| 1.06.05 | 2020-12-11 | 9.0 | 0 |
| 1.05.05 | 2020-09-03 | 9.0 | N/A |
| 1.04.15 | 2020-07-30 | 9.0 | N/A |
| Firmware version | Release date | OS version | Feature level |
|---|---|---|---|
| 1.07.15 | 2024-01-15 | 11 | 3 |
| 1.06.14 | 2023-12-11 | 11 | 3 |
| 1.05.12 | 2023-11-20 | 11 | 3 |
| 1.04.10 | 2023-10-26 | 11 | 3 |
| 1.03.07 | 2023-09-13 | 11 | 3 |
| 1.02.05 | 2023-08-03 | 11 | 3 |
| 1.01.03 | 2023-06-16 | 11 | 3 |
| 1.00.01 | 2023-03-31 | 11 | 3 |
| Firmware version | Release date | OS version | Feature level |
|---|---|---|---|
| 3.03.10 | 2023-05-29 | 10 | 3 |
| 3.02.06 | 2022-07-25 | 10 | 3 |
| 3.01.05 | 2022-03-01 | 10 | 3 |
| 3.00.03 | 2021-10-21 | 10 | 3 |
| 2.10.16 | 2022-04-20 | 9.0 | 3 |
| 2.09.14 | 2021-11-25 | 9.0 | 2 |
| 2.07.11 | 2021-04-29 | 9.0 | 2 |
| 2.06.08 | 2020-12-02 | 9.0 | 2 |
| 2.05.07 | 2020-08-13 | 9.0 | N/A |
| 2.04.05 | 2020-06-08 | 9.0 | N/A |
| 2.03.04 | 2020-03-11 | 9.0 | N/A |
| 1.10.22 | 2020-11-16 | 8.1 | N/A |
| 1.09.18 | 2020-06-17 | 8.1 | N/A |
| 1.07.15 | 2019-12-27 | 8.1 | N/A |
| Firmware version | Release date | OS version | Feature level |
|---|---|---|---|
| 3.10.14 | 2021-01-15 | 8.1 | N/A |
| 3.09.13 | 2020-10-29 | 8.1 | N/A |
| 3.08.11 | 2020-06-10 | 8.1 | N/A |
| 3.07.09 | 2019-09-27 | 8.1 | N/A |
| 3.06.08 | 2019-06-14 | 8.1 | N/A |
| 3.04.06 | 2019-03-15 | 8.1 | N/A |
| Firmware version | Release date | OS version | Feature level |
|---|---|---|---|
| 1.02.09 | 2022-07-27 | 9.0 | 2 |
| 1.00.04 | 2020-08-06 | 9.0 | 2 |
| Firmware version | Release date | OS version | Feature level |
|---|---|---|---|
| 1.13.002 | 2024-01-15 | 11 | 3 |
| 1.08.001 | 2023-10-11 | 11 | 3 |
| 1.07.001 | 2023-09-04 | 11 | 3 |
| 1.06.001 | 2023-08-24 | 11 | 3 |
| 1.05.001 | 2023-07-11 | 11 | 3 |
| 1.04.001 | 2023-04-28 | 11 | 3 |
| 1.03.007 | 2023-02-09 | 11 | 3 |
| 1.02.002 | 2022-11-10 | 11 | 3 |
| Firmware version | Release date | OS version | Feature level |
|---|---|---|---|
| 4.06.12 | 2022-06-07 | 9.0 | 3 |
| 4.05.09 | 2022-01-03 | 9.0 | 3 |
| 4.01.03 | 2021-04-08 | 9.0 | 2 |
| 3.04.05 | 2021-01-07 | 8.1 | 0 |
| 3.03.04 | 2020-08-07 | 8.1 | 0 |
| 3.02.02 | 2020-06-03 | 8.1 | N/A |
| 3.01.01 | 2019-12-18 | 8.1 | N/A |
| 2.25.46 | 2020-10-27 | 7.1 | N/A |
| 2.24.44 | 2020-07-20 | 7.1 | N/A |
| 2.23.42 | 2020-06-03 | 7.1 | N/A |
| 2.22.41 | 2019-12-20 | 7.1 | N/A |
| 2.21.38 | 2019-09-17 | 7.1 | N/A |
| 2.20.34 | 2019-06-05 | 7.1 | N/A |
| 2.19.31 | 2019-04-30 | 7.1 | N/A |
Special Characters
Inside the visual formatter strings, it is possible to manage special characters in a different way.
From the input string, the special characters are not converted in any way, so they can be checked using the escape sequence related to the character.
In the output they can be specified in the same way, but they can also be specified by some tags that have been created to simplify the usage of special characters.
The table below shows the tags and the corresponding escape sequences used to specify those characters.
| Special Character Name | Tag | Escape Sequence (Unicode) | Escape Sequence (Short Version) |
|---|---|---|---|
| SOH | [SOH] | \u0001 | N/A |
| STX | [STX] | \u0002 | N/A |
| ETX | [ETX] | \u0003 | N/A |
| EOT | [EOT] | \u0004 | N/A |
| ENQ | [ENQ] | \u0005 | N/A |
| ACK | [ACK] | \u0006 | N/A |
| BEL | [BEL] | \u0007 | N/A |
| BS | [BS] | \u0008 | \b |
| TAB | [HT] | \u0009 | \t |
| LF | [LF] | \u000A | \n |
| VT | [VT] | \u000B | \v |
| FF | [FF] | \u000C | \f |
| CR | [CR] | \u000D | \r |
| SO | [SO] | \u000E | N/A |
| SI | [SI] | \u000F | N/A |
| DLE | [DLE] | \u0010 | N/A |
| DC1 | [DC1] | \u0011 | N/A |
| DC2 | [DC2] | \u0012 | N/A |
| DC3 | [DC3] | \u0013 | N/A |
| DC4 | [DC4] | \u0014 | N/A |
| NAK | [NAK] | \u0015 | N/A |
| SYN | [SYN] | \u0016 | N/A |
| ETB | [ETB] | \u0017 | N/A |
| CAN | [CAN] | \u0018 | N/A |
| EN | [EN] | \u0019 | N/A |
| SUB | [SUB] | \u001A | N/A |
| ESC | [ESC] | \u001B | N/A |
| FS | [FS] | \u001C | N/A |
| GS | [GS] | \u001D | N/A |
| RS | [RS] | \u001E | N/A |
| US | [US] | \u001F | N/A |
| DEL | [DEL] | \u007F | N/A |